Check out the powerful new masking tools in Adobe Lightroom

Today, Adobe announced a number of Creative Cloud app updates at their Adobe Max virtual expo, the company's annual developer conference. While there are plenty of features and improvements to focus on, this article and video will center around what I believe is the most powerful and important update to Adobe Lightroom: masking.
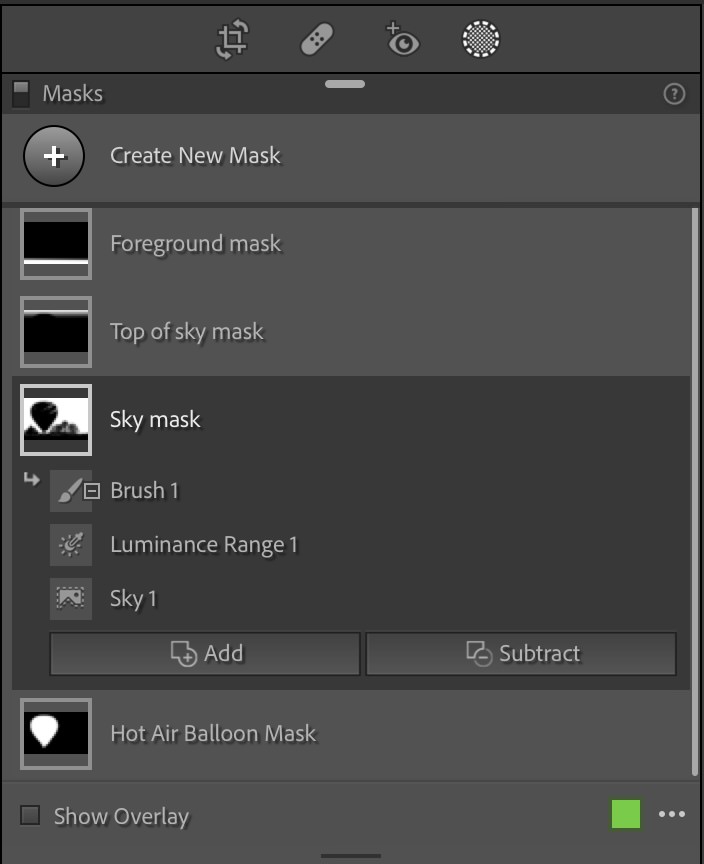
Prior to this update, masking in Lightroom was a convoluted process. By using certain selection tools—the Adjustment Brush tool, Linear Gradient tool, and Radial Gradient tool—you could make targeted selections to selectively edit portions of your photo. A few years ago, Adobe added additional range selection tools with the Color Range and Luminance Range utilities. These were powerful additions, but they had been frustratingly limited to Lightroom Classic. If you used the newer version of Lightroom (as I have been), you were out of luck. Thankfully, today's update finally brings those range masking tools, along with the Depth Range tool, to all versions of Lightroom including on mobile! But that's not even the biggest update!
The first thing you'll notice when you go to the Develop are new icons below the histogram. Well, most should be familiar aside from the new Masking icon. When you click on the Masking icon, a new panel will appear with some very exciting new tools that use AI to automatically detect and select certain objects.
To recap, the two new AI-powered selection tools are:
- Select Subject - used to quickly select an object or objects, often when placed in the foreground of the composition.
- Select Sky - used to quickly select the sky in your scene. It even works especially well with complex horizons and semi-transparent objects, like tree branches.
And to be honest, these two new options would be plenty on their own. But, Adobe didn't stop there. Arguably, the more exciting update to masking has to do with how you manage multiple masks AND how they can interact with each other. That additional flexibility comes through thanks to the new Add and Subtract buttons, along with the new Intersect option. When you combine any of the existing selection tools (the Adjustment Brush tool, Linear Gradient tool, and Radial Gradient tool) and the auto Sky/Subject detection with the Add and Subtract button, you can quickly and easily create precise, razor sharp selections to apply targeted adjustments.
Admittedly, it's a bit difficult to fully explain the power and potential of the new Masking tools, which is why I recorded this video tutorial. I share several ways to creatively utilize the new masking tools. In fact, in some cases, 100% of my edits were done only using these new masking tools! It really is an impressive update, so be sure to watch the video and try it out for yourself!
The Only Course Designed to Help You Use Lightroom Everywhere!


