Want To Get Pro-Level Sharpening In Lightroom?
When I first started learning about photography, I kept my priorities simple. I aimed to learn the basics of my camera and exposure to get a photo to look correct. After I got the hang of those items, I moved on to gain a deeper understanding of what it means to craft a composition.
With the mechanics of exposure becoming second nature, I spent more time on the arrangement of the photo. I'd routinely ask myself, "What is the purpose of this photo?" while scanning the perimeter of the frame to ensure that everything placed within the composition was supposed to be there.

Along with improving my composition skills, I also put in a lot of effort to learn how to edit my photos. But here's what's interesting. While my lessons in exposure and composition were more linear—that is, I started at the bottom and gradually improved on a consistent path—my lessons in editing were wildly varied. I'd go down one deep rabbit hole, hit a stopping point, climb out, and dive into another. I found a lot more creative license by learning how to edit photos.
Interestingly enough, as I became more confident in my understanding of photo editing, I realized that the same principles I use when establishing my composition apply to my editing. Earlier, I wrote that when forming a composition, I ask, "What is the purpose of this photo?" In other words, how can I arrange it so that the viewer is taken into the photo?
With editing, I ask a similar question: "How can I direct the viewer's eyes to go where I want them to go?" The answer to that requires understanding what attracts our eyes at first glance. Generally, our eyes snap to color and contrast. And while I can spend lots of time discussing color and the editing tools we can use to manipulate them, I will focus on contrast. Specifically, sharpening.
Sharpening is contrast?
Basically, yes! I know that when we often think of contrast in a photo editing perspective, we think about tone and how bright areas differ from dark areas. That's certainly true. However, that very concept of contrast (bright and dark) is how sharpening works in Lightroom.

What do you think of when envisioning Lightroom's Sharpening tools in action? I imagine you envision things getting more defined, edges getting sharper, and details getting more pronounced. And you'd be correct in that. However, what mechanism is Lightroom using to get those results? You guessed it: Contrast!
When you add sharpening using Lightroom, it detects all the edges within your photo and applies contrast to make them look more defined. Dark edges will get darker, and light edges will get lighter. The result is an image that looks sharper.
How to use Sharpening in Lightroom

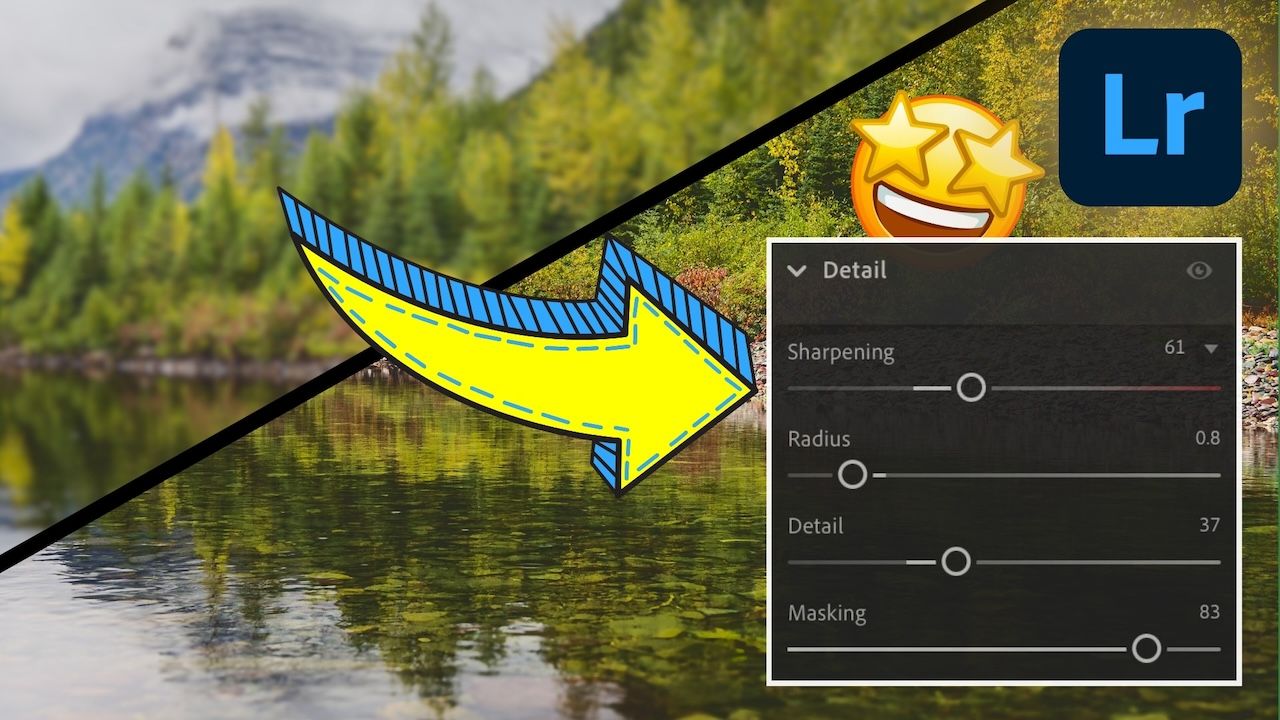
All versions of Lightroom (Desktop, Classic, and Mobile) have the same four sliders. You can use these sliders to control how much sharpening is applied to your photo and where it should be applied. The better you understand these sliders, the more effective you will be in adding a tasteful amount of sharpening to your photos.
Sharpening (Amount in Lightroom Classic): This slider controls how much sharpening will be applied to your photo. You may notice that Lightroom usually applies a default amount of sharpening (usually 40), but you can adjust it to suit your taste and the needs of the photo. It's important to know that as you increase the amount of sharpening in your photo, you will also increase the amount of noise. I prefer to zoom in on my primary subject by at least 100% to ensure I can better see the sharpening effect.
Radius: This slider controls how far along each edge sharpening should be applied and is represented in pixels, with a range of 0.5px - 3.0px. The smaller the radius, the more subtle the sharpening will look along each edge. As you increase the radius, you will see edges become more defined. However, it is also possible to introduce distracting haloes as a result. I generally use 0.5px - 1.0px as my radius range.
Detail: This slider controls which edges will be sharpened. Lower values will result in only large edges having sharpening applied. As you drag the slider to the right, you will see smaller, more fine edges get sharpened. I use Lightroom's default value for the Detail slider and have been consistently happy with the results.
Masking: This slider controls where sharpening is applied by removing it from areas lacking defined edges, such as skies and clouds. I recommend two things with the Masking slider:
- Ensure you are "zoomed to fit" to see the entire image.
- Press and hold the Option (Mac) / Alt (Windows) key while dragging this slider to visualize where sharpening is being applied. Areas in black will have sharpening removed, while areas in white will have it applied. I generally stop moving this slider when the mask resembles a "pencil sketch" of the image, as illustrated below.

Seeing Lightroom Sharpening In Action
Visualizing a tool such as Sharpening in action can sometimes be easier, so I also created this video tutorial for you to enjoy.
When you're done, I highly recommend checking out Lightroom Everywhere, my comprehensive course that'll teach you everything you need to know about managing, editing, and sharing your photos using Lightroom Desktop and Mobile.
The Only Course Designed to Help You Use Lightroom Everywhere!


