Your Complete Guide to Getting Better Sunrise & Sunset Photos

Sunrise and sunset photos are especially popular with photographers, capturing both the natural beauty and vivid colors over a scene as the sun makes its first or final showing of the day. Due to the unique composition of these scenes, it's important to understand what optimal camera settings, planning, and editing techniques are required to capture these beautiful photos.
For example, the dynamic range of sunset scenes can be challenging for the camera to capture, but a beautiful and creative image can be achieved with the right settings. For this guide, I will refer to sunset photography instead of "sunrise and sunset photography" because I prefer photographing later in the day, and I'm not a morning person 😁. All of the tips and techniques in this guide apply to sunrise and sunset photography, so there's no need to worry.
Regarding the best camera settings for sunset photography, it's important to remember that there is no one-size-fits-all technique. Optimal settings will vary depending on the conditions you're shooting in and the lens and camera combination you're using. However, some standard principles can be applied to any sunset photography situation to ensure ideal results.
I've also included a free editing tutorial video toward the end of this guide that utilizes my AI-powered preset pack for Adobe Lightroom and Photoshop. You'll learn some common editing techniques and see how you can vastly improve the overall look of your photos in as little as one click using the power of Adobe Lightroom's AI tools. One important note: while the tutorial was recorded using Lightroom Classic, everything I show works exactly the same in Lightroom Desktop, including the ability to import and sync my Landscape AI preset pack.
Chapters
-
Exposure
-
ISO
-
Aperture
-
Shutter speed
-
White Balance
-
Bracketing
-
Camera lenses and filters
-
Using a tripod
-
Planning your shoot
-
Sunset photo editing video
Camera settings: Get proper exposure every time
Exposure
The first setting to consider is exposure. The exposure triangle—which includes ISO, shutter speed, and aperture settings—must be balanced to prevent overexposed or underexposed photos. For example, when using a small aperture, such as f/16, the ISO may need to be raised for more light sensitivity, or the shutter speed may need to be extended to increase exposure.
However, creative expression sometimes precedes technical perfection, and underexposure or overexposure may be used for added drama or a gentler look and feel. For example, you may decide to underexpose so that you are exposing for brighter highlights (with the sun being the brightest highlight imaginable). Doing this will add more contrast and prominence to the shadows, creating a dramatic feel to the composition.
ISO
ISO should generally be set as low as possible during sunset photography to prevent over-exposed photos and graininess in the image. As the sun sinks below the horizon and the amount of light in the composition decreases, the ISO can be increased to compensate. However, your image will have more visible noise as you increase the ISO because of the added camera sensor sensitivity. Fortunately, several capable tools, such as Topaz Photo AI, can intelligently remove noise without losing detail.
Alternatively, a tripod can keep the ISO low, and the shutter speed can be slowed to allow more light into the sensor. We'll discuss tripods in greater depth later in this guide.
Aperture
The lens aperture is another essential setting to consider when shooting sunset photos. The aperture value determines exposure, depth of field, and image sharpness. A large aperture reduces the depth of field and makes the background softer (bokeh), while a smaller aperture brings sharp focus to the foreground and background. Generally, for sunset photography, the aperture should be set somewhere in the middle range, between f/8 and f/16. This range provides the best depth of field and keeps the image sharp.
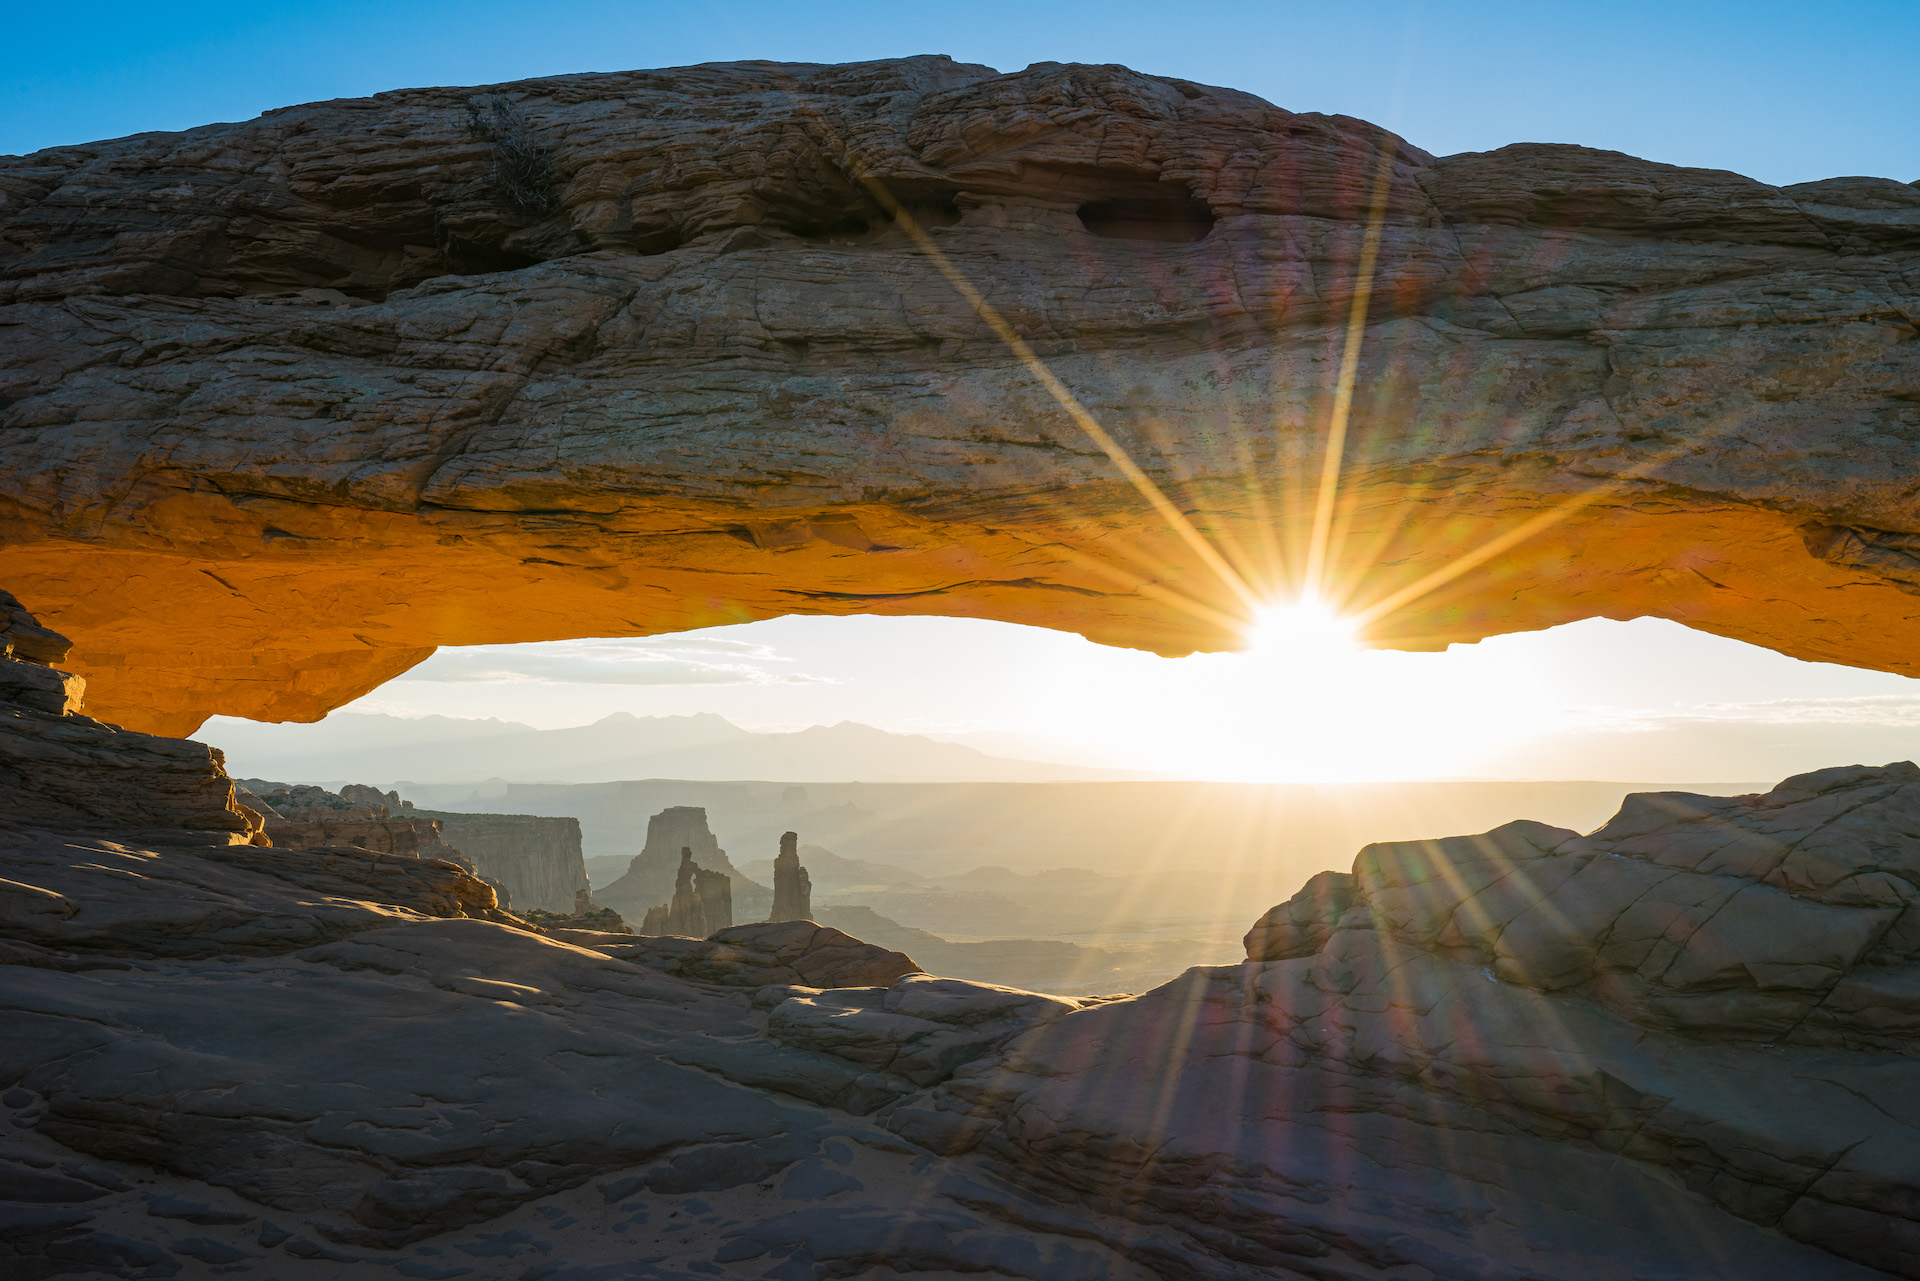
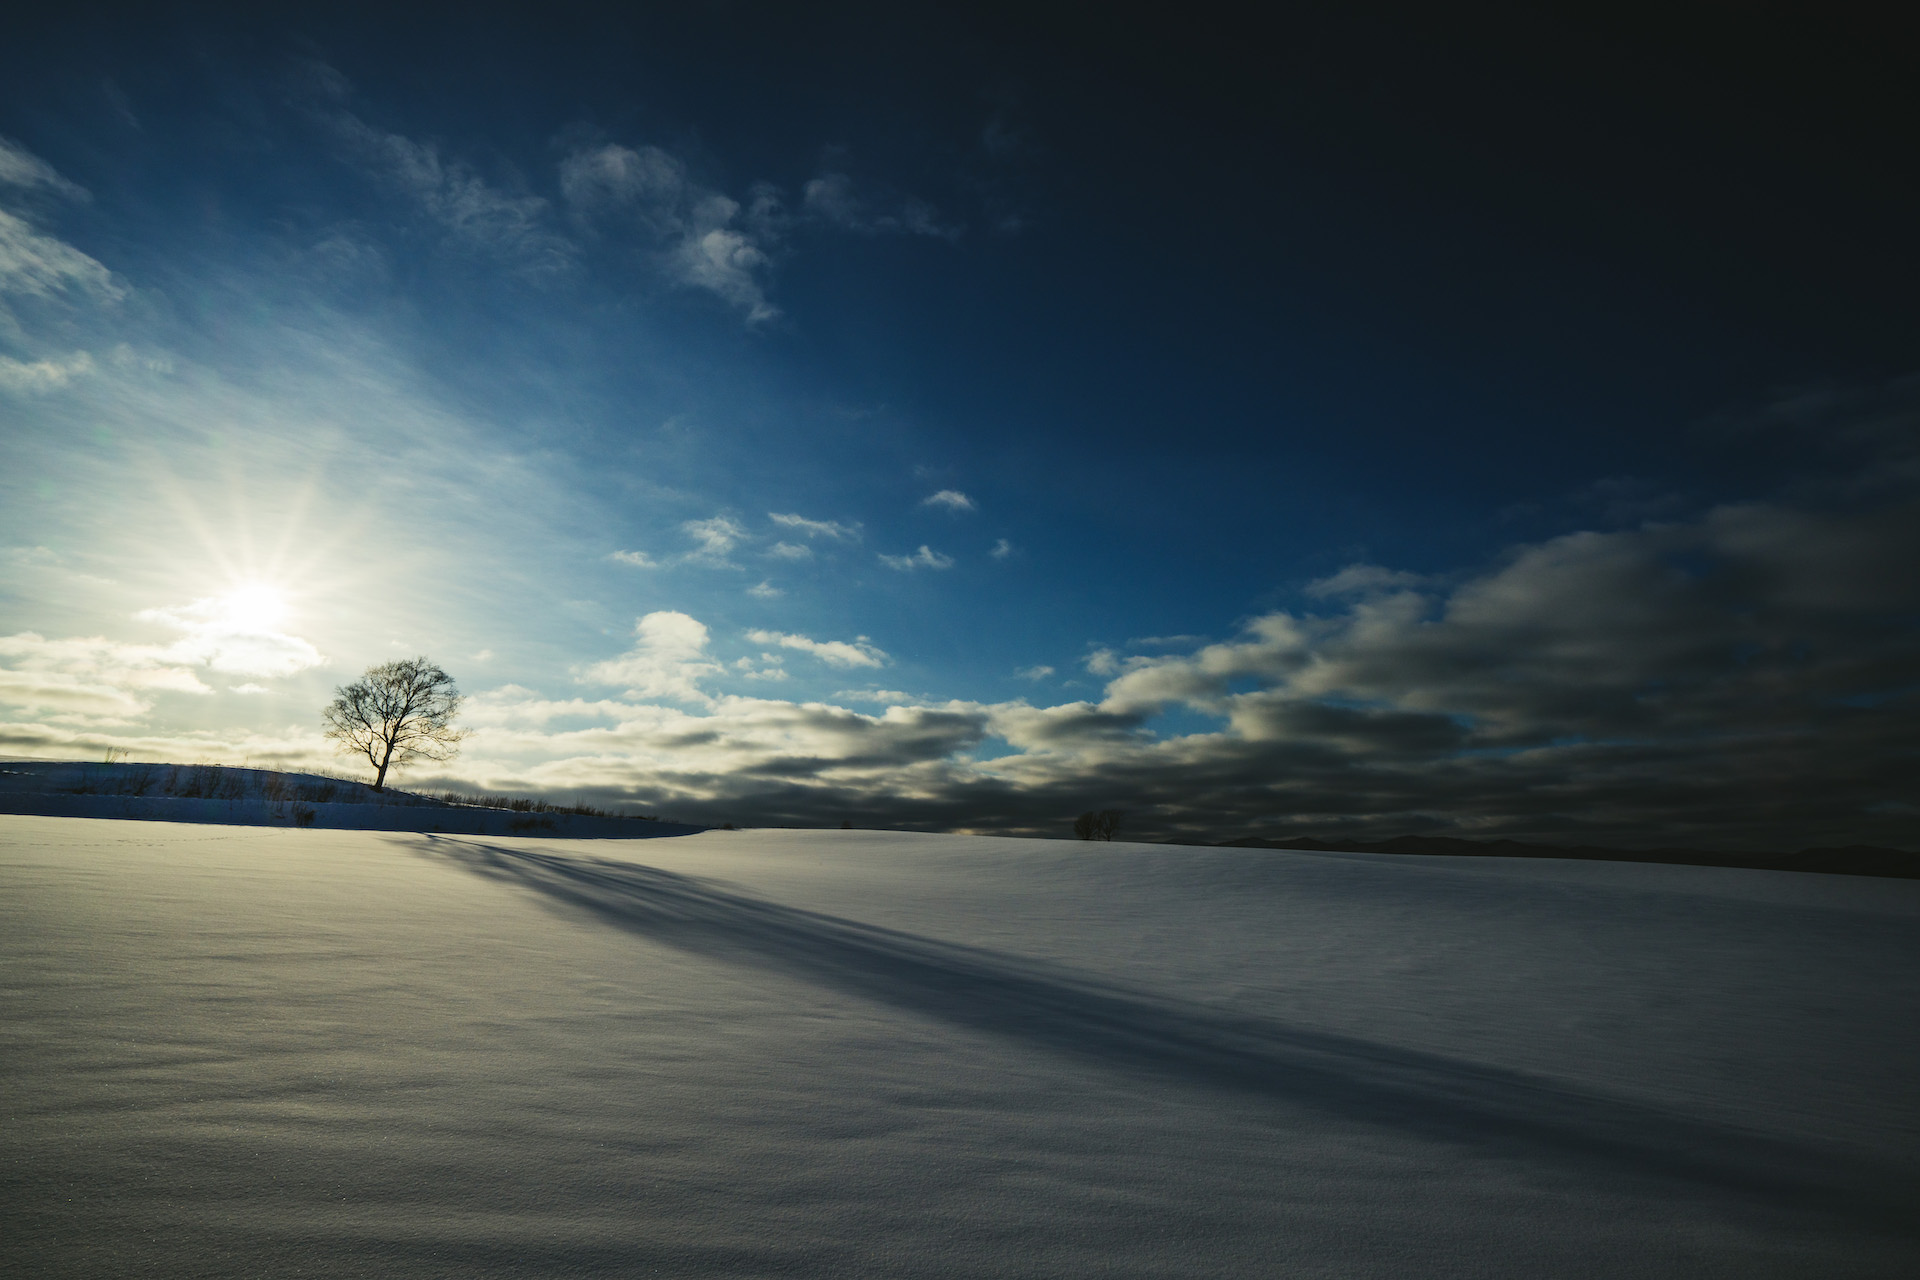
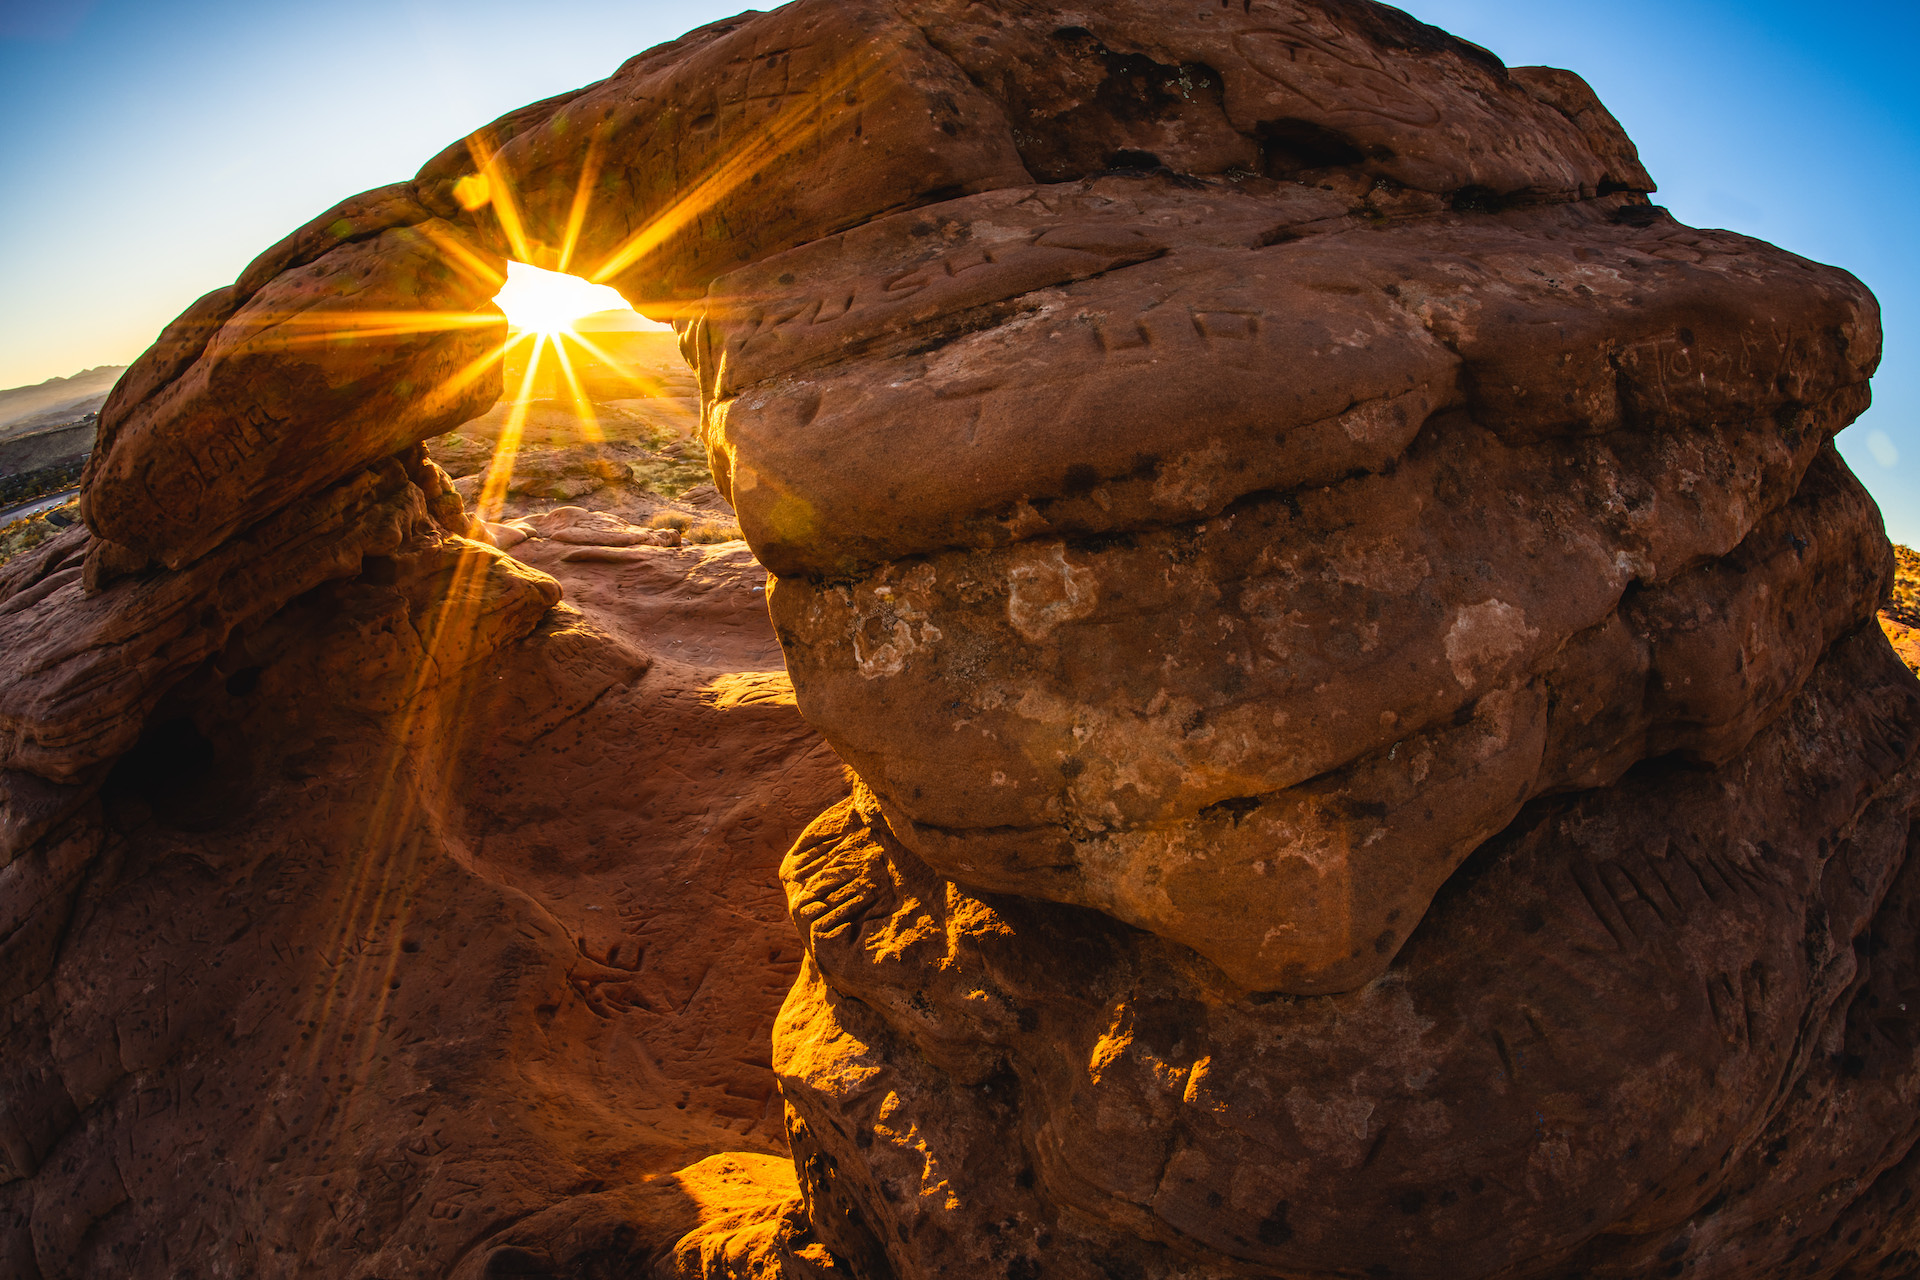
The aperture also plays a critical role in the presence and definition of a sunburst. Several factors will determine the definition of a sunburnt, including the quality of the lens glass, the number and material of the aperture blades, and the clarity of the sun itself in the composition. Sunbursts become more defined with longer and clearer "legs" as you use smaller apertures. I find excellent results between f/13 - f/18. You'll also want to ensure that your lens is clean and free of dust or other obstructions because those may appear as unintended and distracting specular highlights. Finally, sunbursts are most pronounced when the sun converges with a high-contrast edge, such as the horizon or another element.
An important point to make when thinking about using an iPhone for this type of shot is that it has a fixed aperture, so you won't be able to control this setting. While the iPhone can produce a bit of a sunburst, it won't be nearly as defined as a lens with a variable aperture. With that said, there are editing tricks you can use to "simulate" a lens burst if that's something you're into.
Shutter speed
Shutter speed is also important when capturing a sunset photo. Like the aperture, shutter speed determines the sharpness and exposure of the image. Given the sun's brightness, a fast shutter speed minimizes exposure time and prevents blown-out images. If the shutter speed is too slow, the image may be blurry due to motion in the composition—such as moving clouds or swaying tree branches—or the camera's movement if you're handholding it. If the shutter speed is too quick, the image may be darker due to less light reaching the sensor.

That is why taking sunset photos using your camera's RAW setting is important (this includes your iPhone). When taking RAW photos, your camera uses all of its sensor data to write the image, and many cameras can save a fully uncompressed file. Editing a RAW file using a competent app such as Adobe Lightroom gives you much greater flexibility to adjust the tones and dynamic range of sunset photos. We'll go over the editing process of sunset photos later in this guide.
White Balance
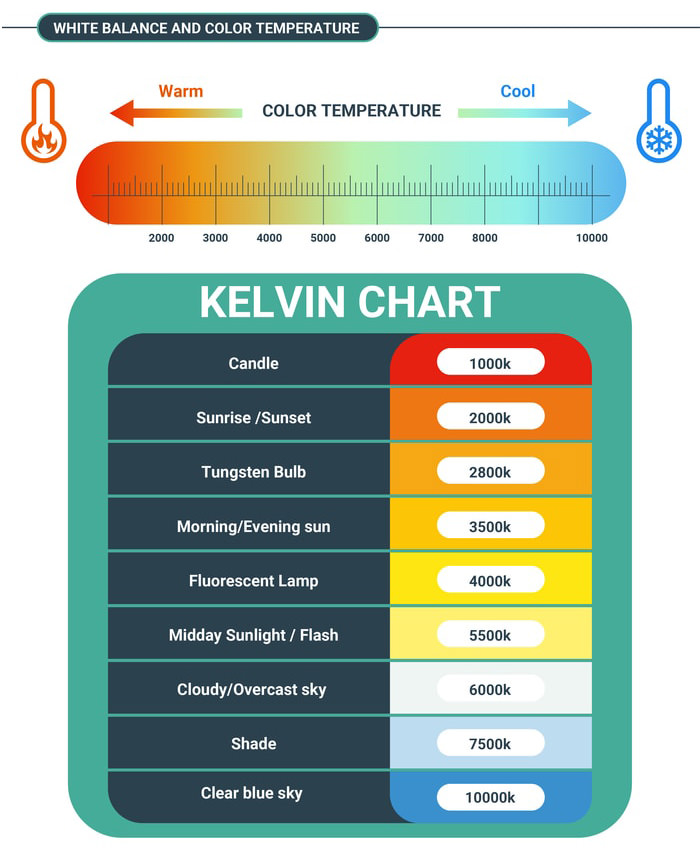
Obtaining an accurate white balance in your sunset photography can significantly enhance the realism of the image. However, you can also use various white balance settings to achieve different tonal and hue effects. Using the "auto" white balance setting is a good starting point for those new to photography. However, it is important to note that the auto setting may not always produce the bright, warm colors commonly associated with sunset shots. In these cases, manually adjusting the white balance using the Kelvin (K) temperature setting can be more effective.
Source: Capture the Atlas
To adjust the white balance using the Kelvin temperature, find your camera's White Balance setting and locate the Kelvin (K) temperature option. The scale for this setting ranges from 1000K to 10000K. It is best to begin at the neutral value of 5500K, approximating average sunlight, and adjust from there. Moving the temperature towards 1000K will warm the image, simulating candlelight, and moving it to 10000K will cool it, simulating a blue sky.

I mentioned a benefit of shooting RAW in the previous section, and here is another one. When you shoot RAW, you can custom set the White Balance or use any of your camera's White Balance presets during post-processing. This adds a layer of flexibility that wouldn't be available with JPEG files. By adjusting the White Balance temperature and tint, you can make subtle adjustments to the overall color balance of your image, ensuring that your sunset photograph looks as true-to-life as possible.
Auto Exposure Bracketing (AEB) for HDR
Auto Exposure Bracketing is a useful technique to use when capturing sunset photos. AEB involves taking multiple photos at different exposures, which can be combined using tone mapping to create an image with a higher dynamic range than the originals.

That is particularly useful for sunset photos, as the scene's dynamic range is often very high and cannot be fully captured in a single image. The size and quality of the camera's sensor are important in determining how much dynamic range can be captured. By bracketing and tone mapping these photos, you can ensure that all parts of the image are properly exposed, from the brightest parts of the sun to the darkest parts of the sky.
Most cameras have bracketing functionality built-in, and there are even some iPhone camera apps, like Pro Camera by Moment, that have bracketing functionality. By leveraging this functionality, you can use tone-mapping to combine these images for a final output that has a much greater dynamic range.
Composition: Add Interest and Depth to Your Sunset Photos
Composition is an essential element in capturing stunning sunset photos. You can create visually stunning images by paying attention to how you arrange the elements in your frame. Here are some tips to help you with your sunset photography composition:
Find a Unique Foreground Element

Including a foreground element in your sunset photo will add depth and interest to your image. A tree, a rock, a pier, or any other subject that catches your eye can be used as a foreground element. The key is to choose something that complements the sunset and doesn't compete with it for attention.
Experiment with Different Perspectives

Get creative with your composition by experimenting with different perspectives. For example, shooting from a low angle can give your sunset photo a more dramatic look. Alternatively, shooting from a high angle can provide a unique perspective and showcase the vastness of the sunset.
Use Leading Lines
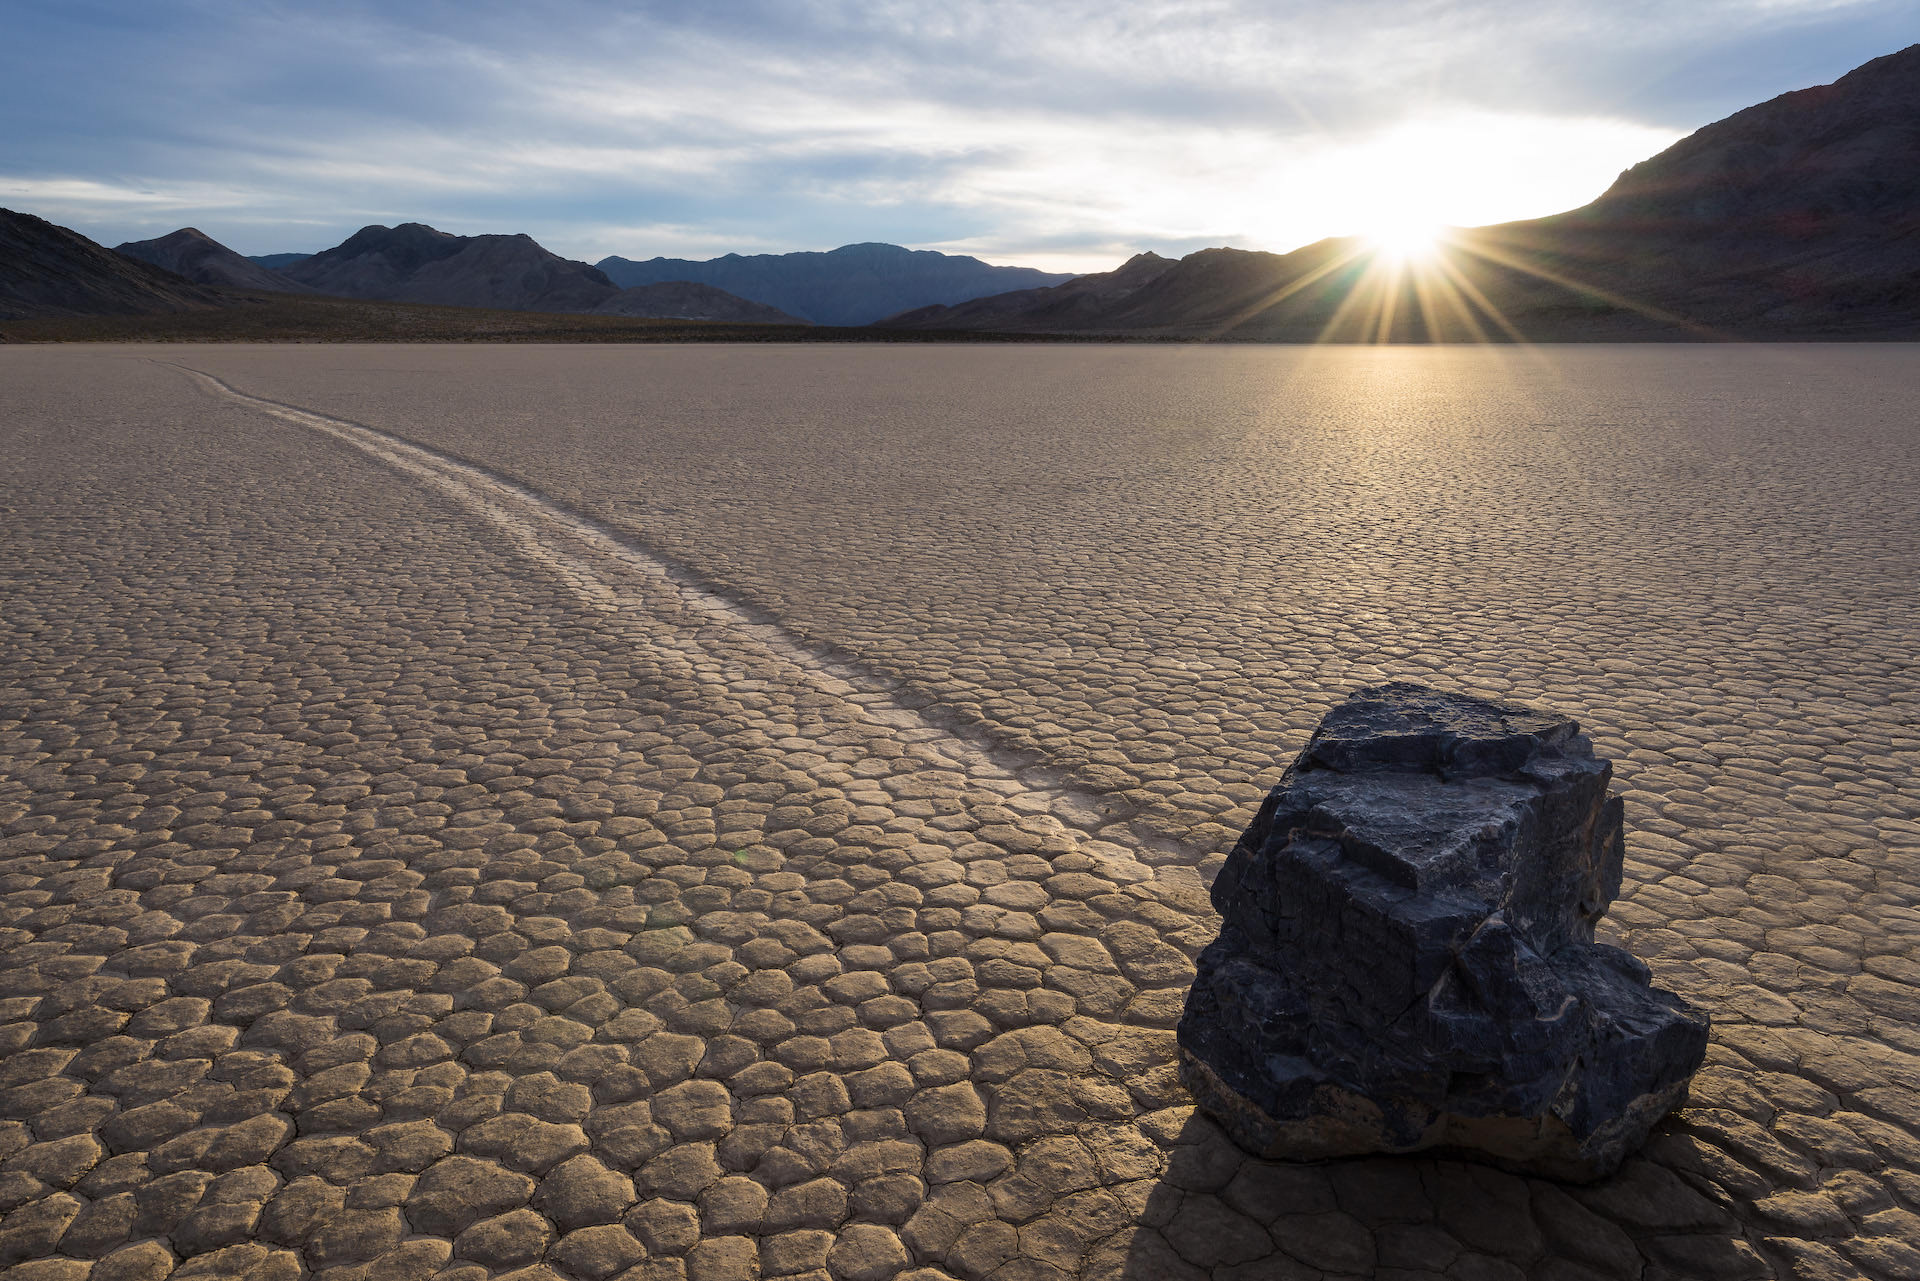
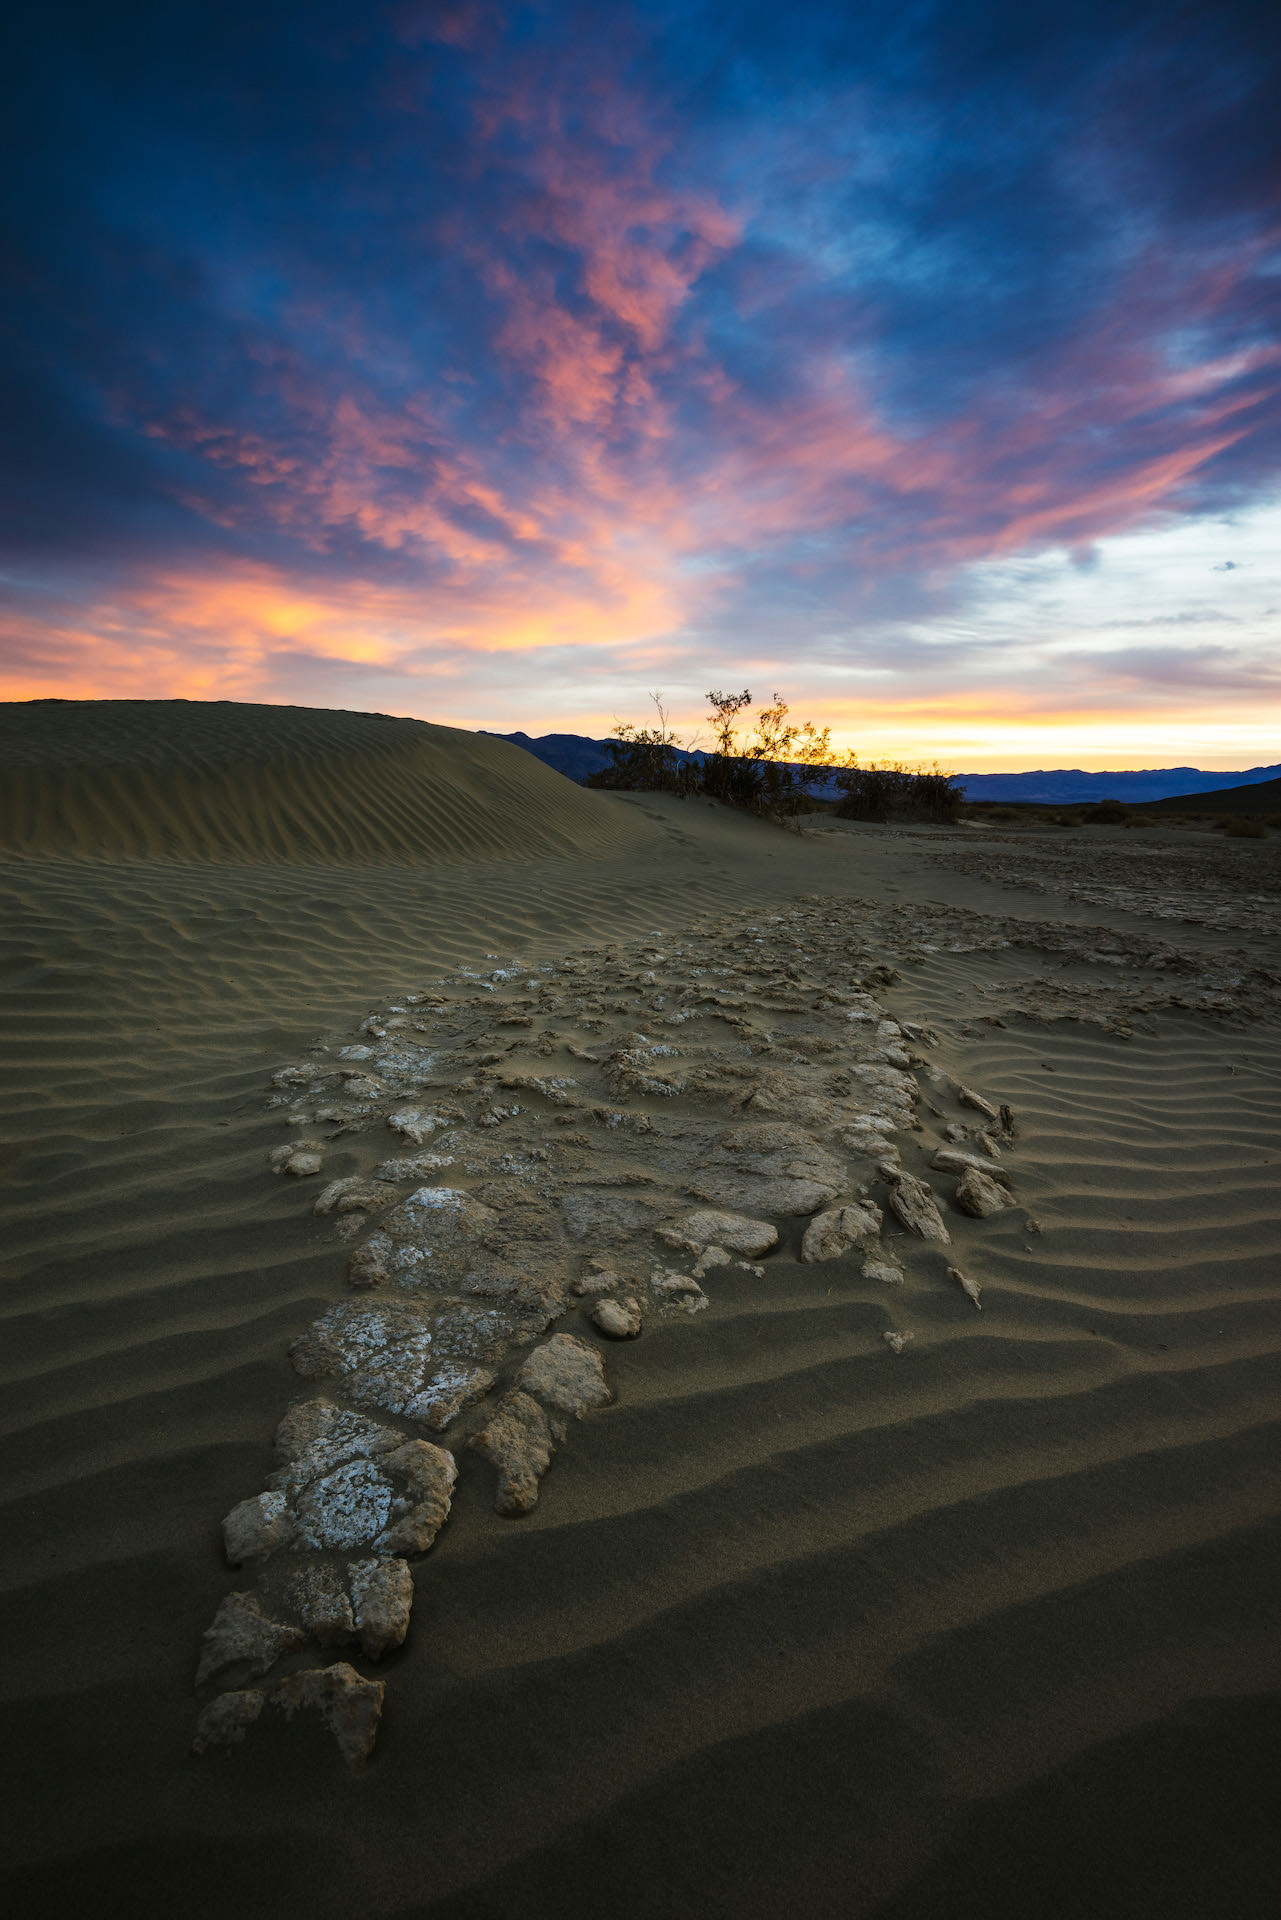
Leading lines are a powerful tool in sunset photography composition. These lines draw the viewer's eye into the photo, guiding them toward the sunset. Look for natural lines in the environment, such as a path or a pier, and use them to lead the viewer toward the sun. In the photo above, I positioned my camera such that the path made by the sailing rock cuts across almost the entirety of the frame. This strong use of leading lines allows the viewer's eyes to travel across the frame from left to right and then pop up to the sunburst in the background.
Apply the Rule of Thirds
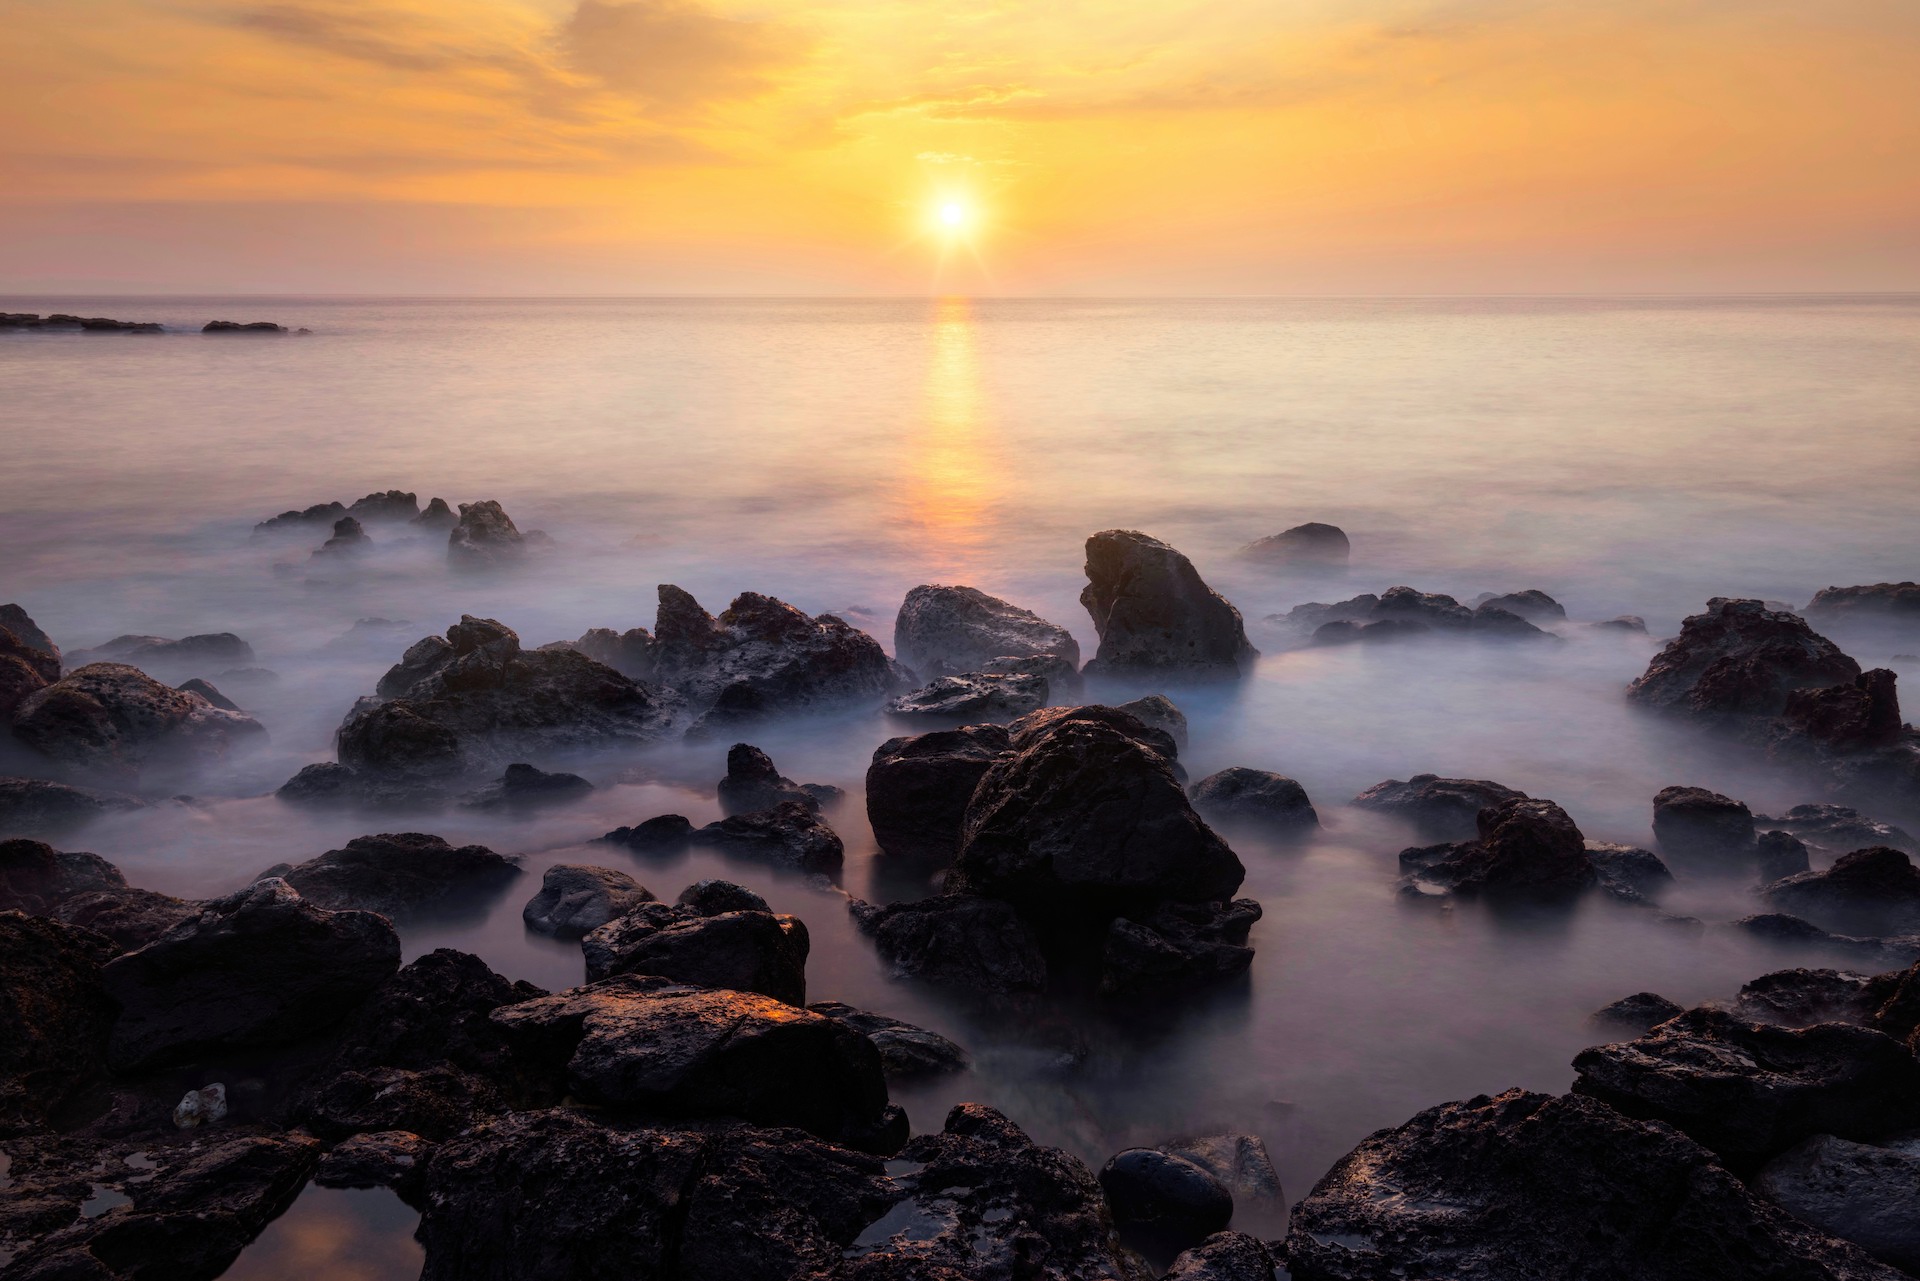
The rule of thirds is a basic compositional principle that can help you take stunning sunset photos. The idea is to divide the frame into nine equal parts—with three horizontal and vertical lines spread equally apart—and place the photo's subject along the lines or at the points where the lines intersect. In the above photo, I placed the horizon and the sun along the top-third horizontal line, serving as a strong anchor point for the viewer's eye.
Camera gear: Use the right tools for the best results
I've shared each of the cameras, lenses, tripods, filters, and other accessories that I reference in the following hardware sections. That list is constantly updated to reflect the actual gear that I'm using at the time.
Camera lenses and filters
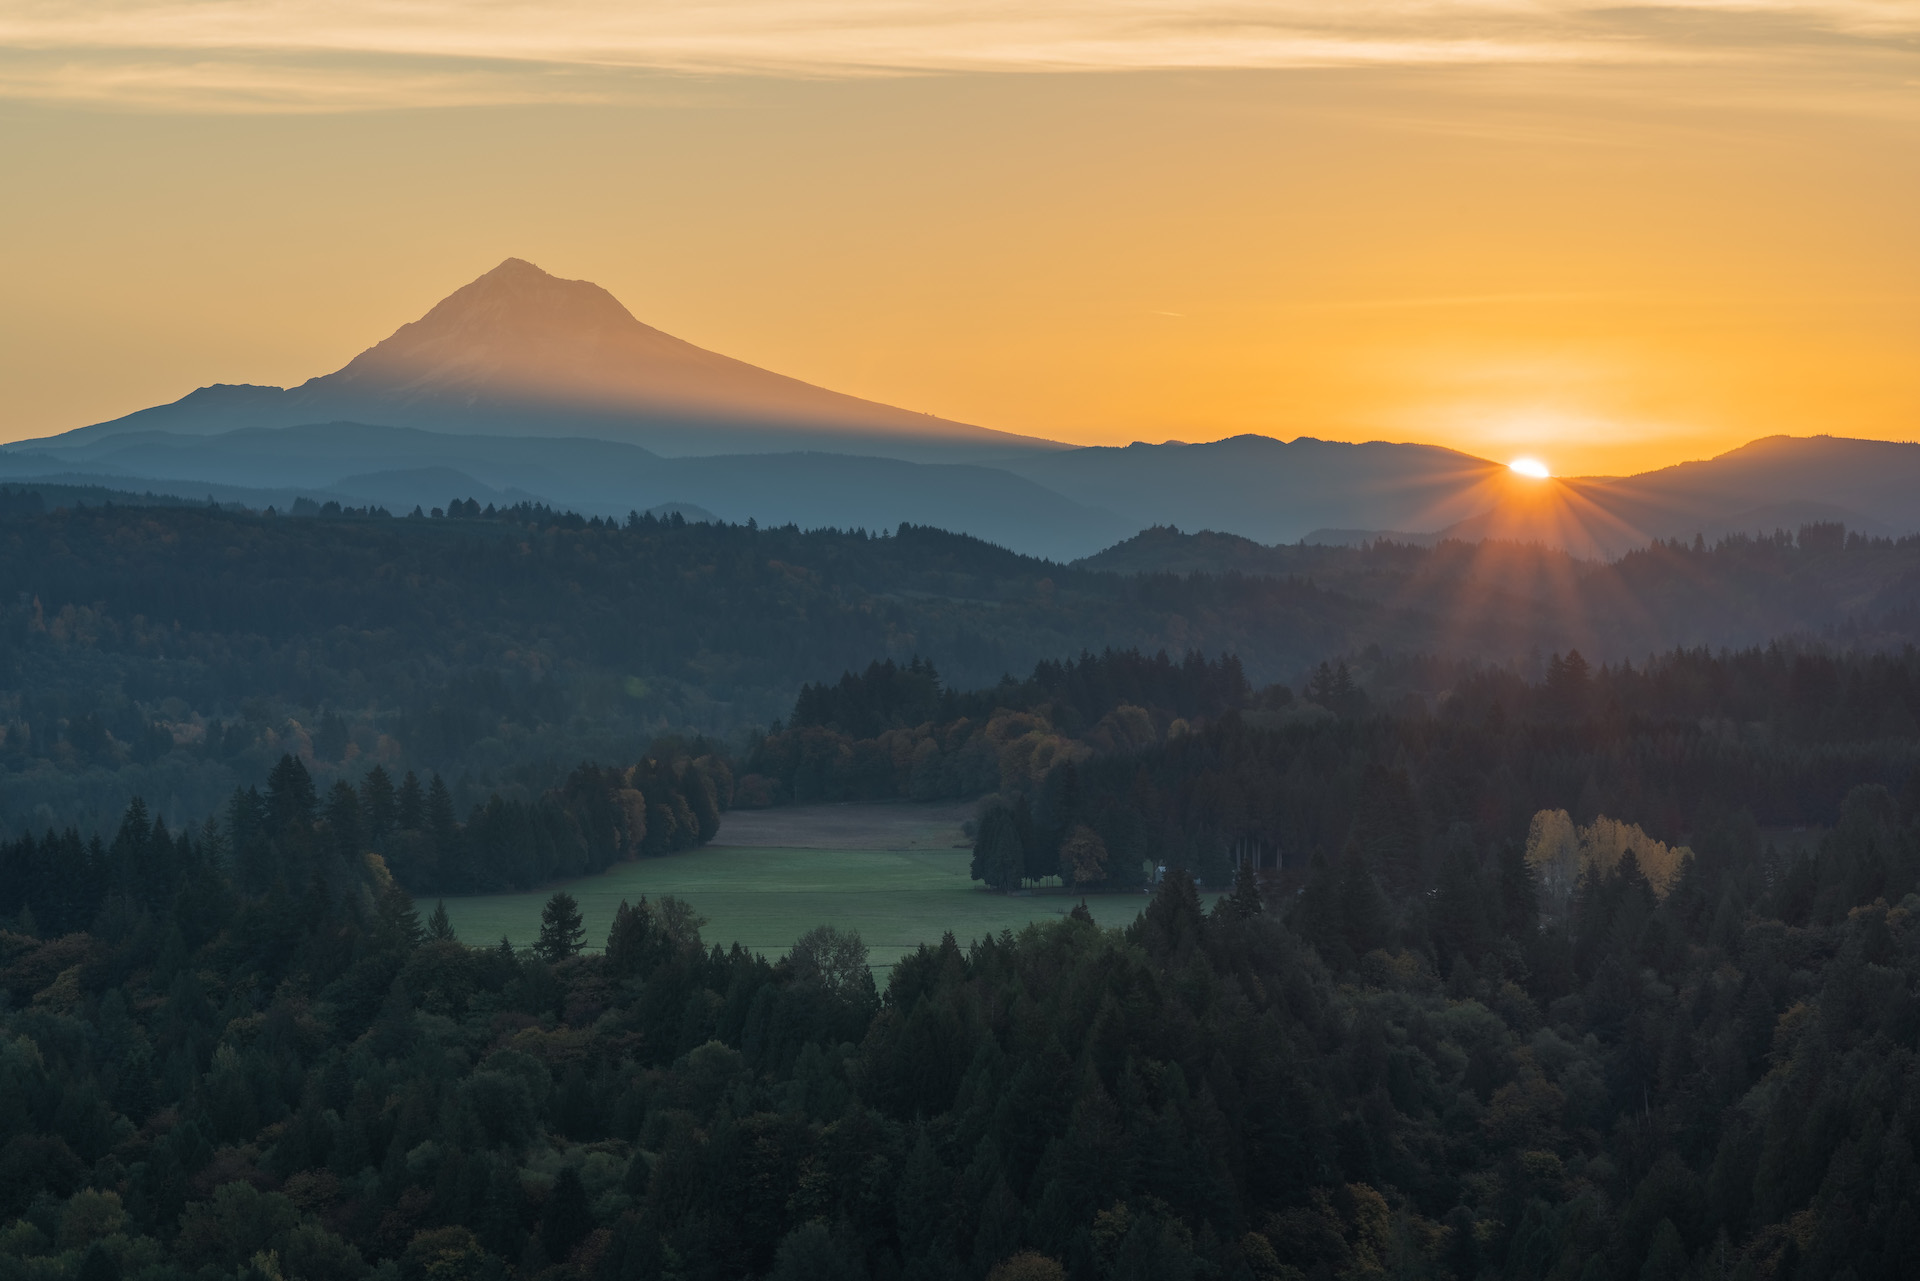
When it comes to lenses, a wide-angle lens is crucial for capturing a grand, panoramic view of the sunset. Look for a 12-18mm focal length lens for the widest shot possible. Longer focal lengths are helpful when you want to isolate the sun around a specific part of the landscape. Telephoto lenses also increase lens compression, providing more relative distance and less distortion than wide-angle lenses. I used my Sony 100-400mm lens to take the photo below because I wanted greater compression. Doing so allowed me to effectively convey the layers from the trees in the foreground to the mountain in the background.
The circular polarizer (CPL) is probably my most used filter for my photography, including during sunsets. In addition to cutting glare and reflections from surfaces such as glass and water, the CPL filter can add rich contrast to skies and bring out warm colors from landscapes. I cannot recommend having a high-quality CPL strongly enough.
A neutral density (ND) filter can also be useful in sunset photography. It helps to reduce the amount of light entering the camera, preventing overexposure, which is a common issue when capturing sunsets. A graduated neutral density filter is a type of ND filter useful for sunset photography because it blocks more light in the top part of the image, preventing the sky from becoming overexposed. Remember to consider the longer shutter speeds required when using an ND filter if you photograph in windy conditions or with lots of moving water.
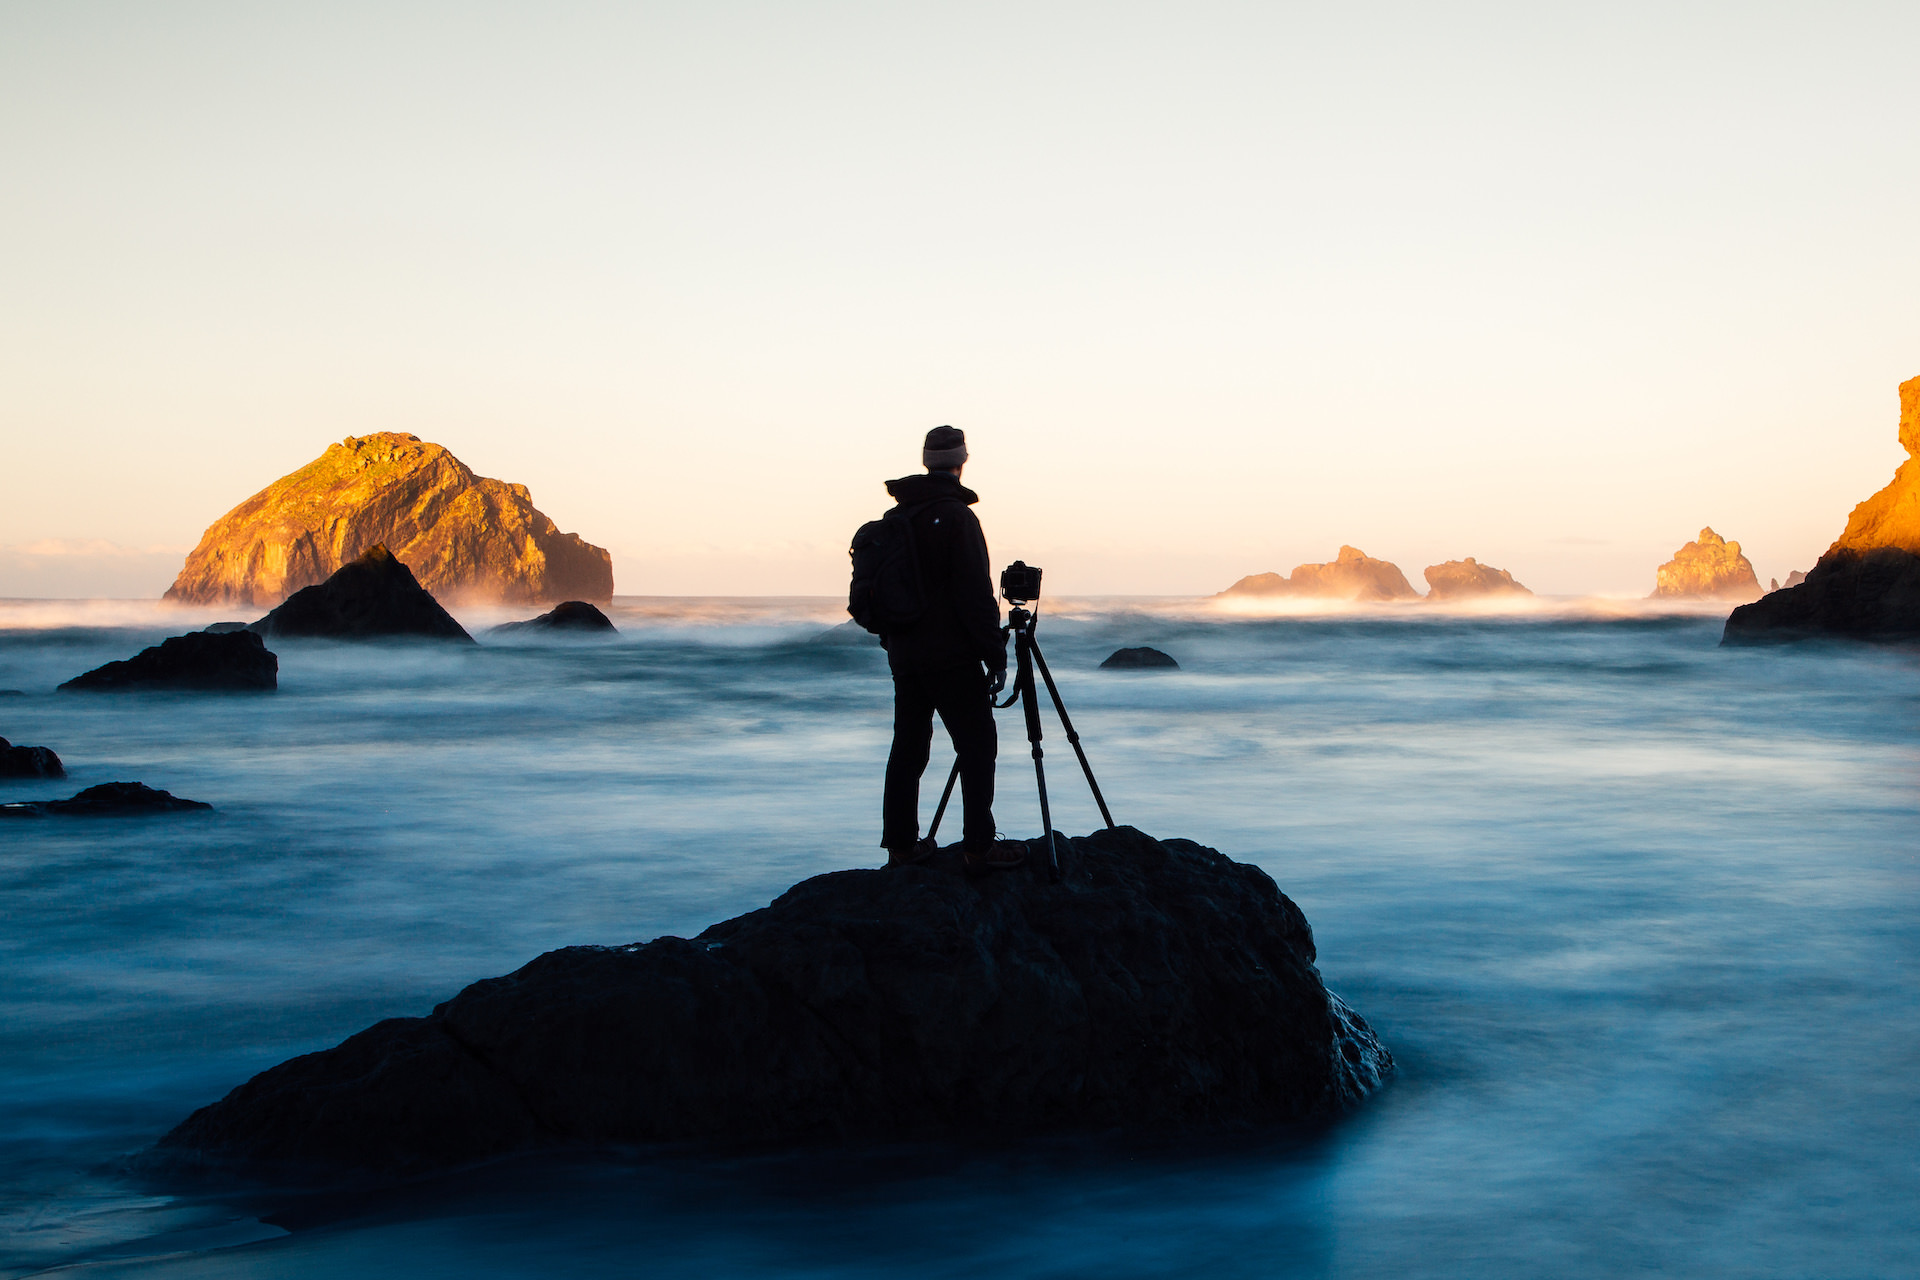
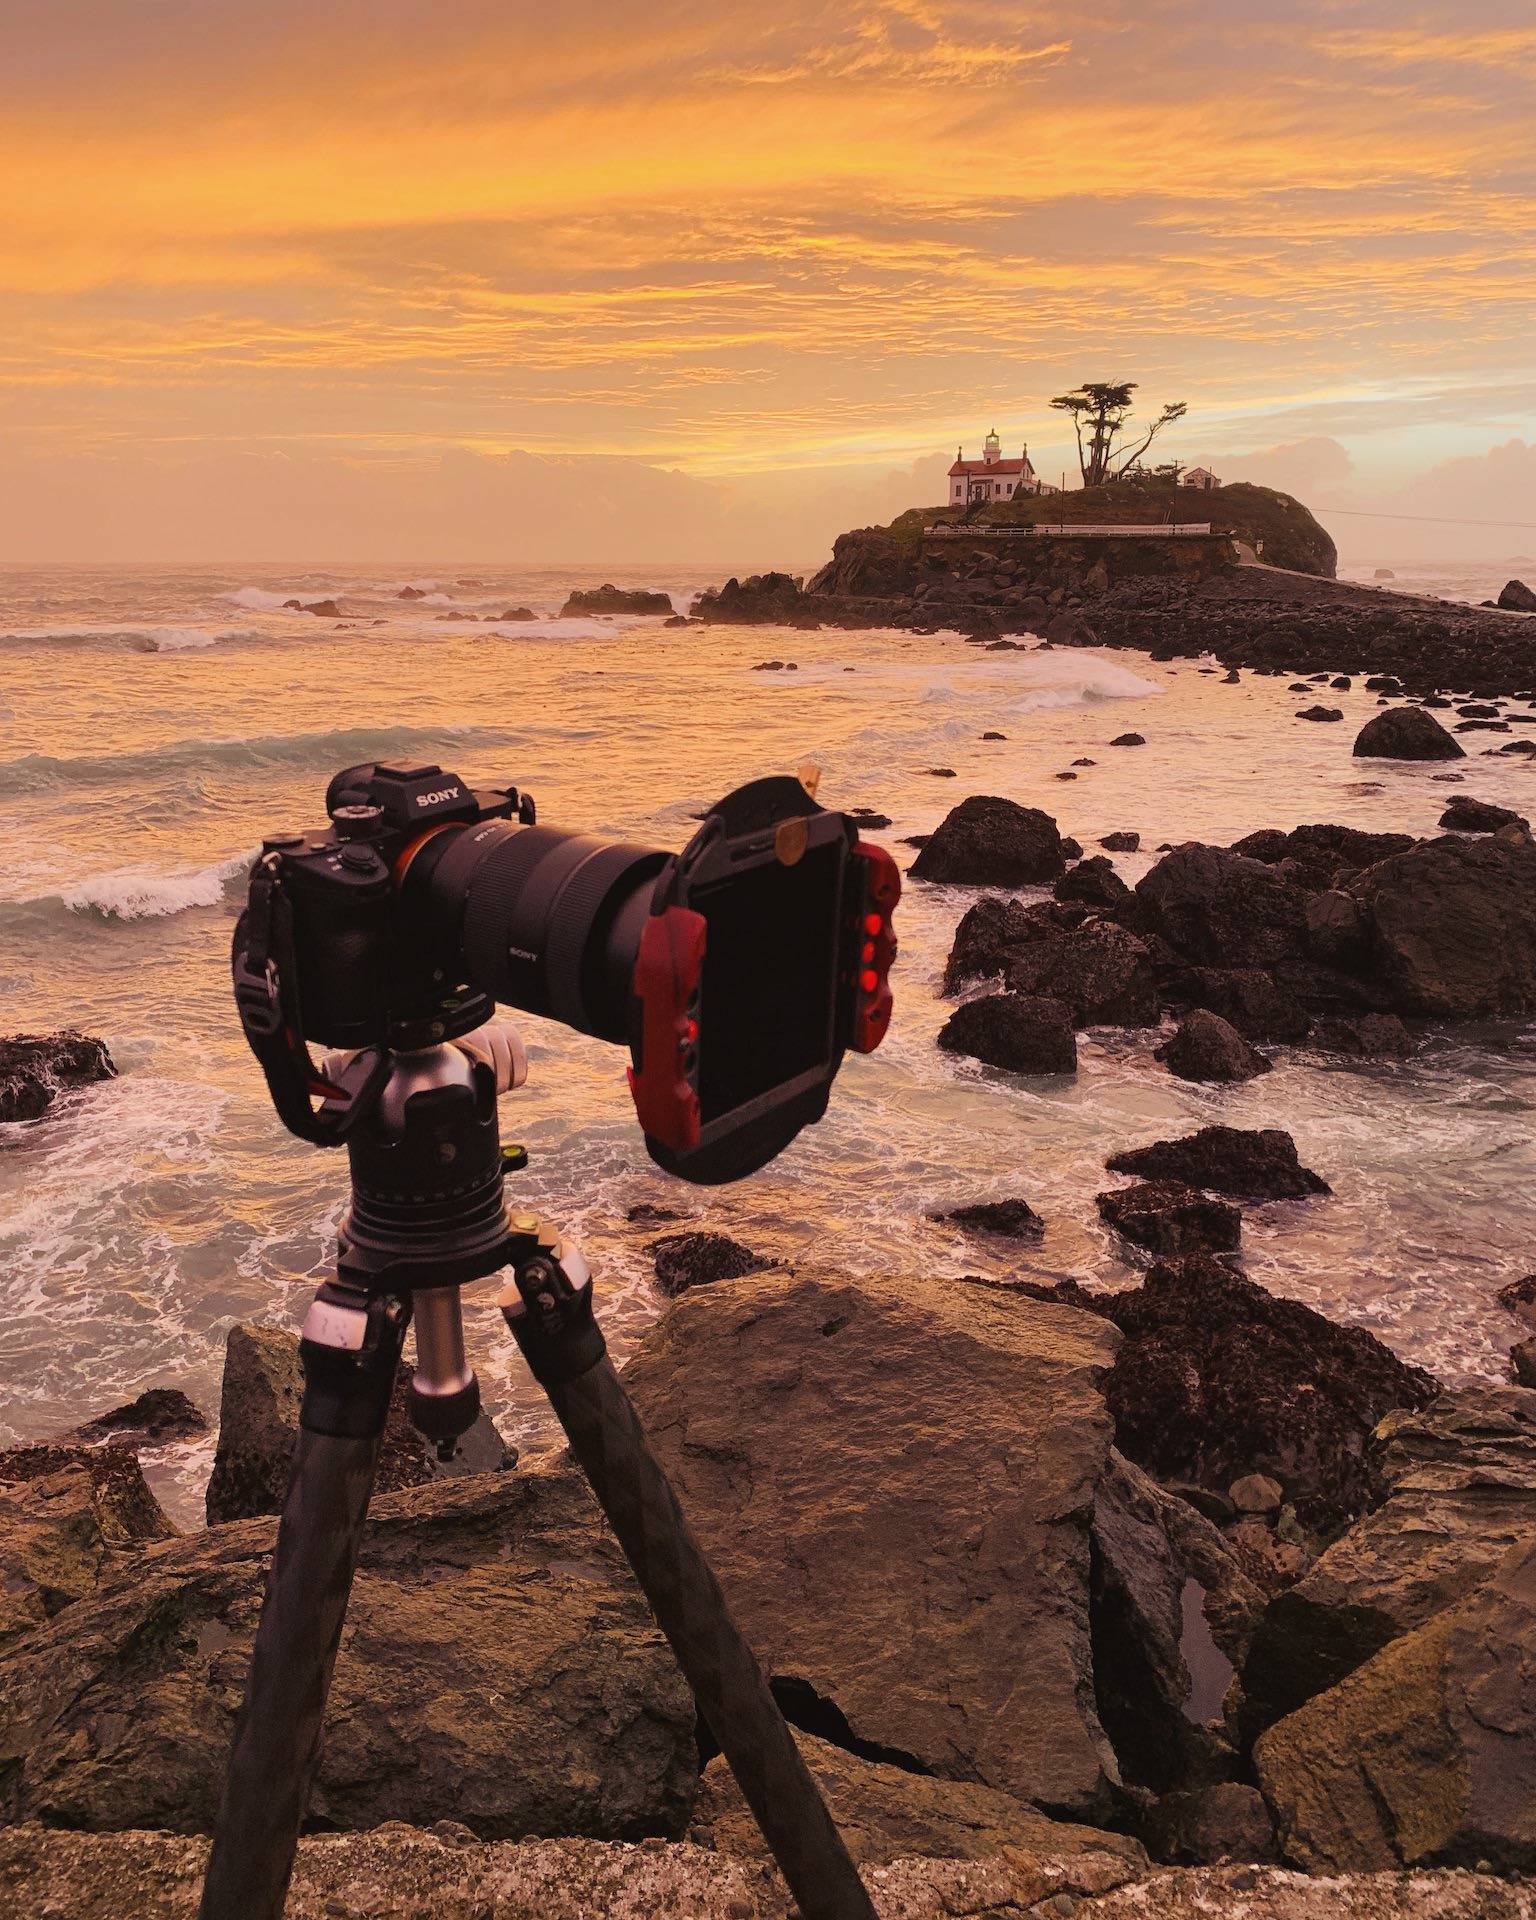
Using a tripod
When it comes to capturing the perfect sunset photo, the stability of your camera is crucial. The camera can be handheld for short exposures with a fast shutter speed, as the risk of blurring is minimal. However, even the slightest camera movement can result in a blurry image for longer exposures with a slower shutter speed. To ensure sharp, clear images, it is essential to use a sturdy, high-quality tripod.

Tripods come in various materials and sizes, and choosing one suitable for your camera and the type of photography you're doing is essential. For example, if you plan to take photos of the sunset at the beach, choosing a tripod that supports spiked feet that can be easily dug into the sand to provide additional stability is important. Additionally, investing in a tripod with a leveling base can be a good idea, allowing you to easily adjust the camera angle without repositioning the entire tripod.
In addition to a tripod, consider using a remote shutter release or your camera's self-timer function to reduce shake. These features allow you to trigger the camera's shutter without physically touching the camera, eliminating the risk of movement. Furthermore, you can set the timer to a few seconds, giving you enough time to press the shutter button and then step away from the camera, ensuring a stable shot.
Planning your shoot
There isn't a general answer as to the best time to take your sunrise or sunset shots. Still, timing is crucial when capturing the perfect sunset photo. The best time to shoot is during the golden hour, the hour before sunset, and the hour after sunrise. During this time, the sun is lower in the sky, and its light is softer, creating a warm and natural look. The low position of the sun also casts longer, more pleasing shadows that provide a greater sense of depth. Factors such as the time of year and your location can affect when and where the sun rises and sets. To determine the best time for your photography, try observing the sun for a few days and plan accordingly.
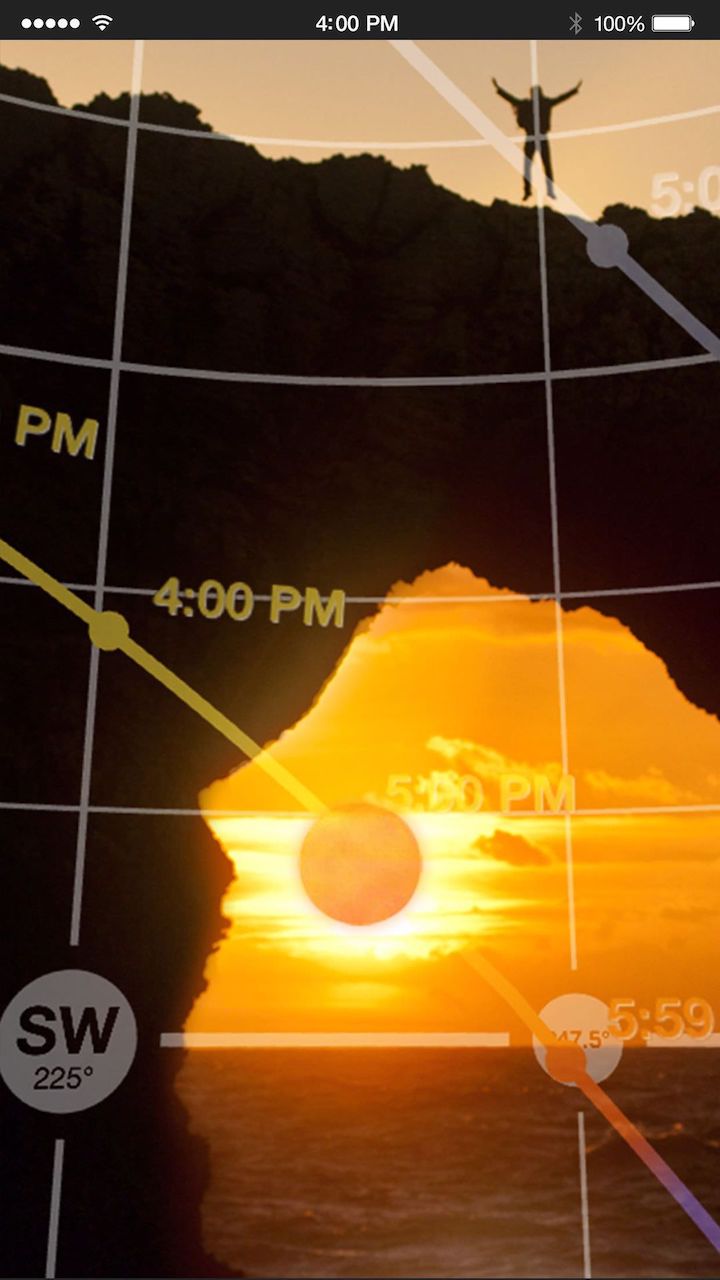
Use tools like Photopills and the Photographer's Ephemeris to plan the sun's position during your shoot and pack all necessary gear in advance, including fully charged batteries and memory cards.
Temperatures are typically cooler during sunrise and sunset, so pack sufficient clothing layers, gloves, and hand/feet warmers. Nothing saps the joy of photography like frozen extremities. To ensure a smooth setup, arrive at the location at least 45 minutes to an hour before sunrise or sunset. That will give you enough time to set up, dial in your settings, and get your photos.
Before embarking on your photography journey, it is critical to have a clear idea of the type of sunset photograph you want to capture. Gather inspiration by looking at the work of other photographers you admire, browsing through photography magazines, or scanning photography websites. With a specific image in mind, you can better plan the location and timing of your shoot.
When you arrive at your chosen location, paying attention to your composition is essential. A beautiful sunset may be breathtaking in person, but the composition will make or break the final image. Utilize composition techniques such as the rule of thirds, contrast, and leading lines to create a more impactful image. I've also found it helpful to review your camera's display (or digital viewfinder) while overexposing the image to simulate brightening the scene. Increasing the ISO will help with that, too. Doing that will help you visualize everything within the frame, even when it's dark and hard to see.
Finally, remember that there are many beautiful photos to take up to an hour before sunrise and after sunset. As the sun dips below the horizon, many soft tones and beautiful colors can still be seen during civil, nautical, and astronomical twilight.
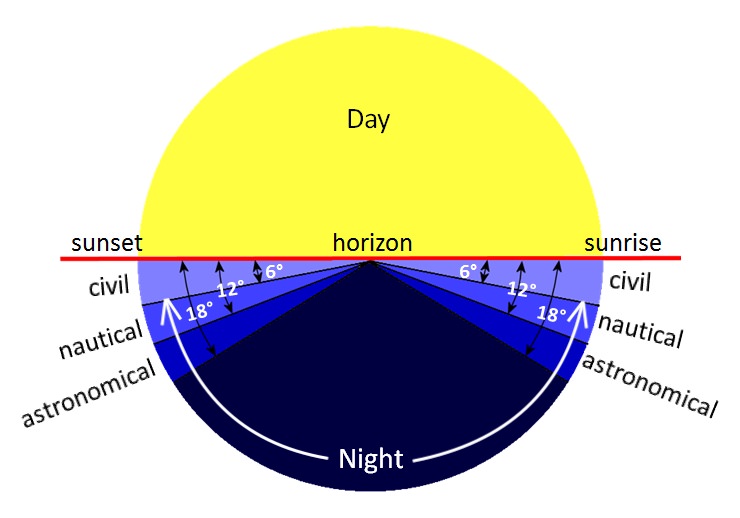
Source: weather.gov
Most of the techniques in this guide have relevance when photographing during these twilight phases, but you should always pay close attention to your exposure settings to ensure that you're
Editing your sunset photos
Once you've captured the perfect sunset photo, it's time to take it to the next level with some post-processing. Most photo editing apps can adjust the image's vibrance, exposure, color profile, and color grading. These small adjustments can make a big difference in the final image.
Another big time-saver when editing your photos is to use intelligent, adaptive presets built to accentuate specific parts of each photo. My Landscape AI preset pack for Adobe Lightroom and Photoshop will instantly improve the quality, color, and clarity of each area of your sunrise and sunset photos in a single click.

You can adjust the look of the sky without messing with the foreground and then make targeted foreground adjustments with a different preset. Check out my start-to-finish editing workflow video of a sunset photo using Adobe Lightroom and the Landscape AI preset pack. Remember, this preset pack works in both versions of Lightroom and can be synced to Lightroom on your mobile devices!
Overall, capturing the perfect sunset photo requires technical understanding and creative expression. By following these tips, you'll be well on your way to creating beautiful sunrise and sunset photos with a strong visual impact. So get creative and have fun with your sunset photography compositions!
It's Time to Learn How To Use Lightroom Everywhere!

If you enjoyed this topic and want to learn how to get the most out of Lightroom's cloud-based ecosystem on the desktop, smartphone, and tablet, then you should check out my Lightroom Everywhere course! It has over nine hours of easy-paced lessons that'll teach you how to make the most out of Lightroom Desktop, Mobile, and Web.
The Only Course Designed to Help You Use Lightroom Everywhere!


