Does RAW noise reduction really make a difference? [Topaz Photo AI Tutorial]

The near-ubiquity and constant evolution of digital cameras have opened up our ability to create beautiful images in just about any condition possible. We capture every moment of our lives and share it with our friends and family on social media. However, sometimes we end up with photos that are too noisy or grainy, which can ruin the entire picture. That is where image noise reduction software comes in. In this article, I'll discuss what noise reduction is, how it occurs, and the importance of using image noise reduction software.

I'll also share an editing video explaining why you may want to apply noise reduction using Topaz Photo AI to your unedited RAW file at the beginning of your post-processing workflow.
What is Image Noise?
Image noise is a phenomenon that occurs in digital photography when the camera sensor captures unnecessary and unwanted visual information. This information appears in the final image as tiny pixels, dots, or specks, which appear as random patterns of colors, dots, and shapes. This phenomenon is commonly known as 'noise.' The noise in an image can be due to various factors such as low light, high ISO settings, long exposure times, or poor camera sensor quality.
There are two primary types of image noise that you'll see: luminance and color (or chromatic) noise.
- Luminance noise often manifests as dark, grainy pixels and occurs when a photo's brightness levels vary greatly.
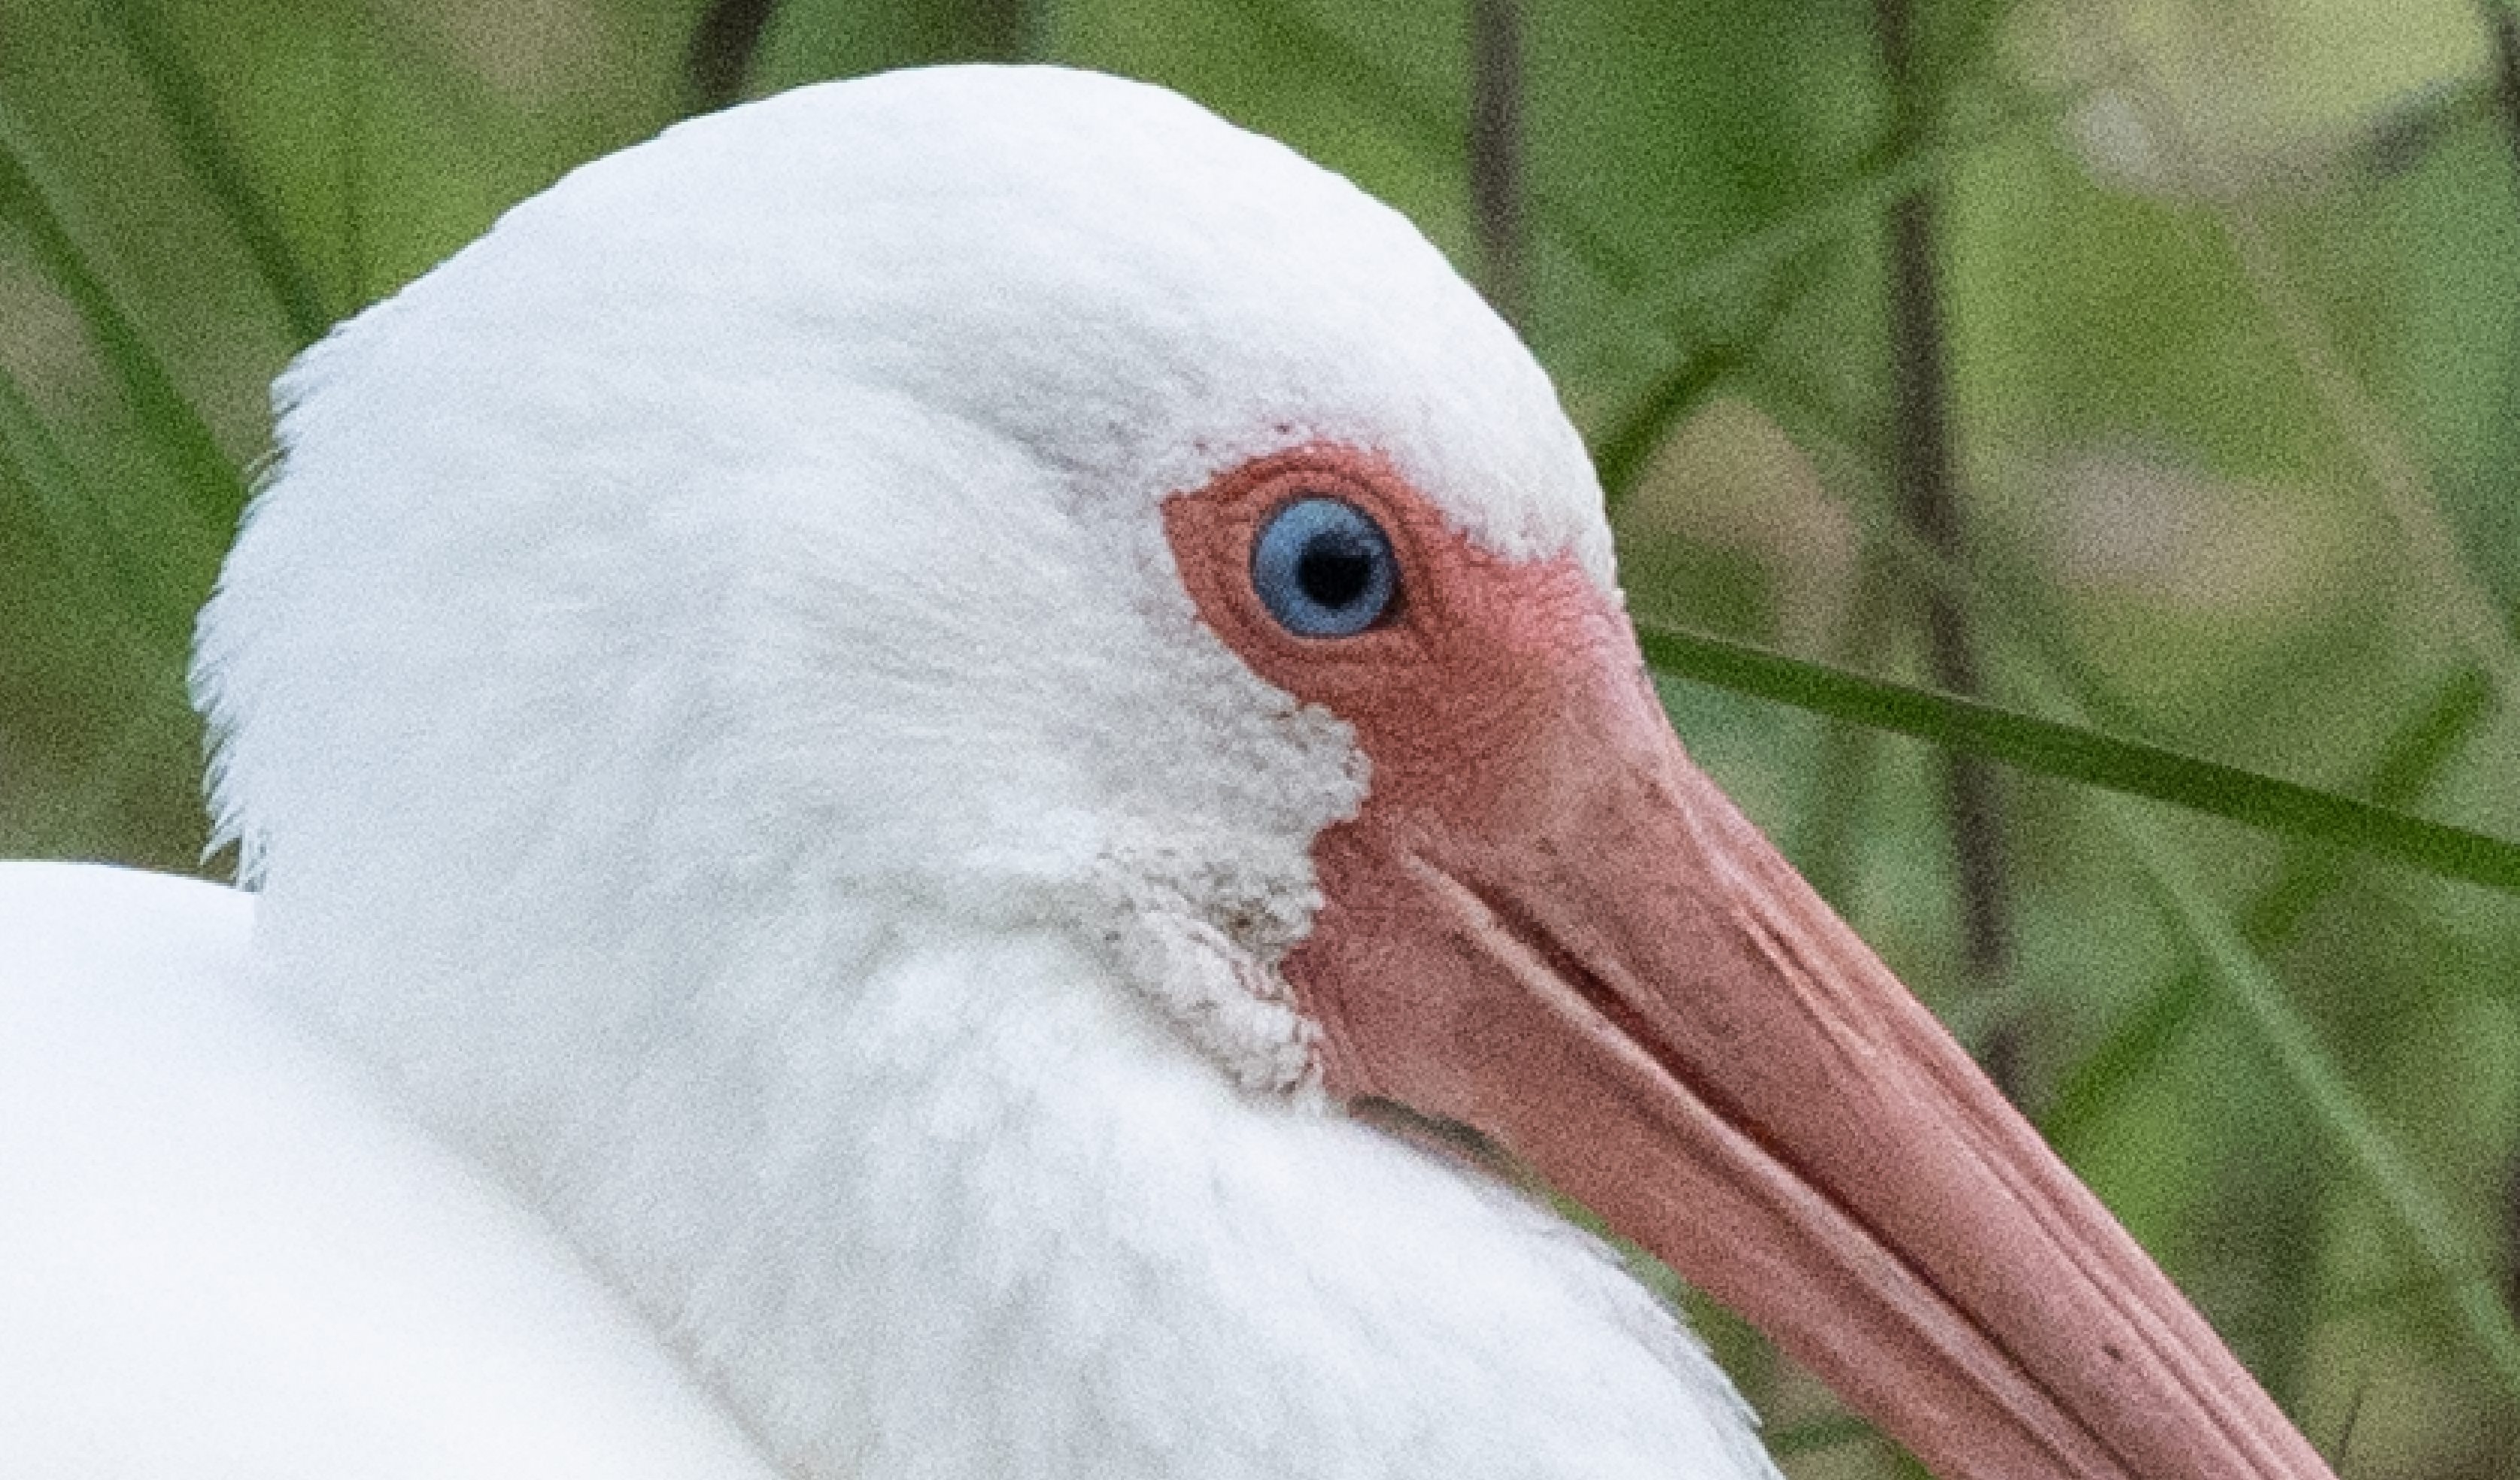
- Color noise presents itself as little colored pixels—usually blue or purple—in the shadows and occurs when you use a high-ISO setting.
How Does Image Noise Occur?
Image noise occurs when the camera sensor becomes more "sensitive" to light and captures more information than is necessary, leading to unwanted and random visual information. When the camera sensor captures an image in low light, it requires more light sensitivity, producing more digital noise. Similarly, when the ISO is set too high, the camera sensor amplifies the image, producing noise. Long exposure times also lead to more noise, as the camera sensor remains open for an extended period and heats up, capturing more visual information.
How to avoid (and eliminate) image noise
Image noise can sometimes be unavoidable depending on the conditions you're photographing in and your camera settings. Fortunately, there are several things you can do to minimize the amount of image noise in your photos.
1. Use Lower ISO Settings
Image noise is most commonly caused by using high ISO settings. I recommended using the lowest ISO possible for your lighting conditions to avoid this. If you are taking photos in a low-light environment, consider using a tripod to keep the camera steady and at longer shutter speeds to allow more light into the camera sensor.
2. Choose the Right Camera Settings
In addition to using lower ISO settings, other camera settings can help reduce image noise, such as aperture. A larger aperture lets in more light, reducing the need for a high ISO setting. You'll want to ensure that the depth of field for that larger aperture suffices for your composition. Another setting to consider is the camera's noise reduction function. Enabling this setting can help reduce noise, but remember that it can also result in losing image detail, and the on-camera processing time can be long. That is why I don't recommend using it (but I am sharing it because of due diligence).
3. Using software to eliminate image noise
While removing image noise using post-processing software is possible, it is important to be mindful of the techniques used. Over-editing an image can result in a loss of detail and image quality. I recommend applying noise reduction in moderation and investing in high-quality software that provides options to adjust the method and amount of noise reduction.
The Importance of Image Noise Reduction
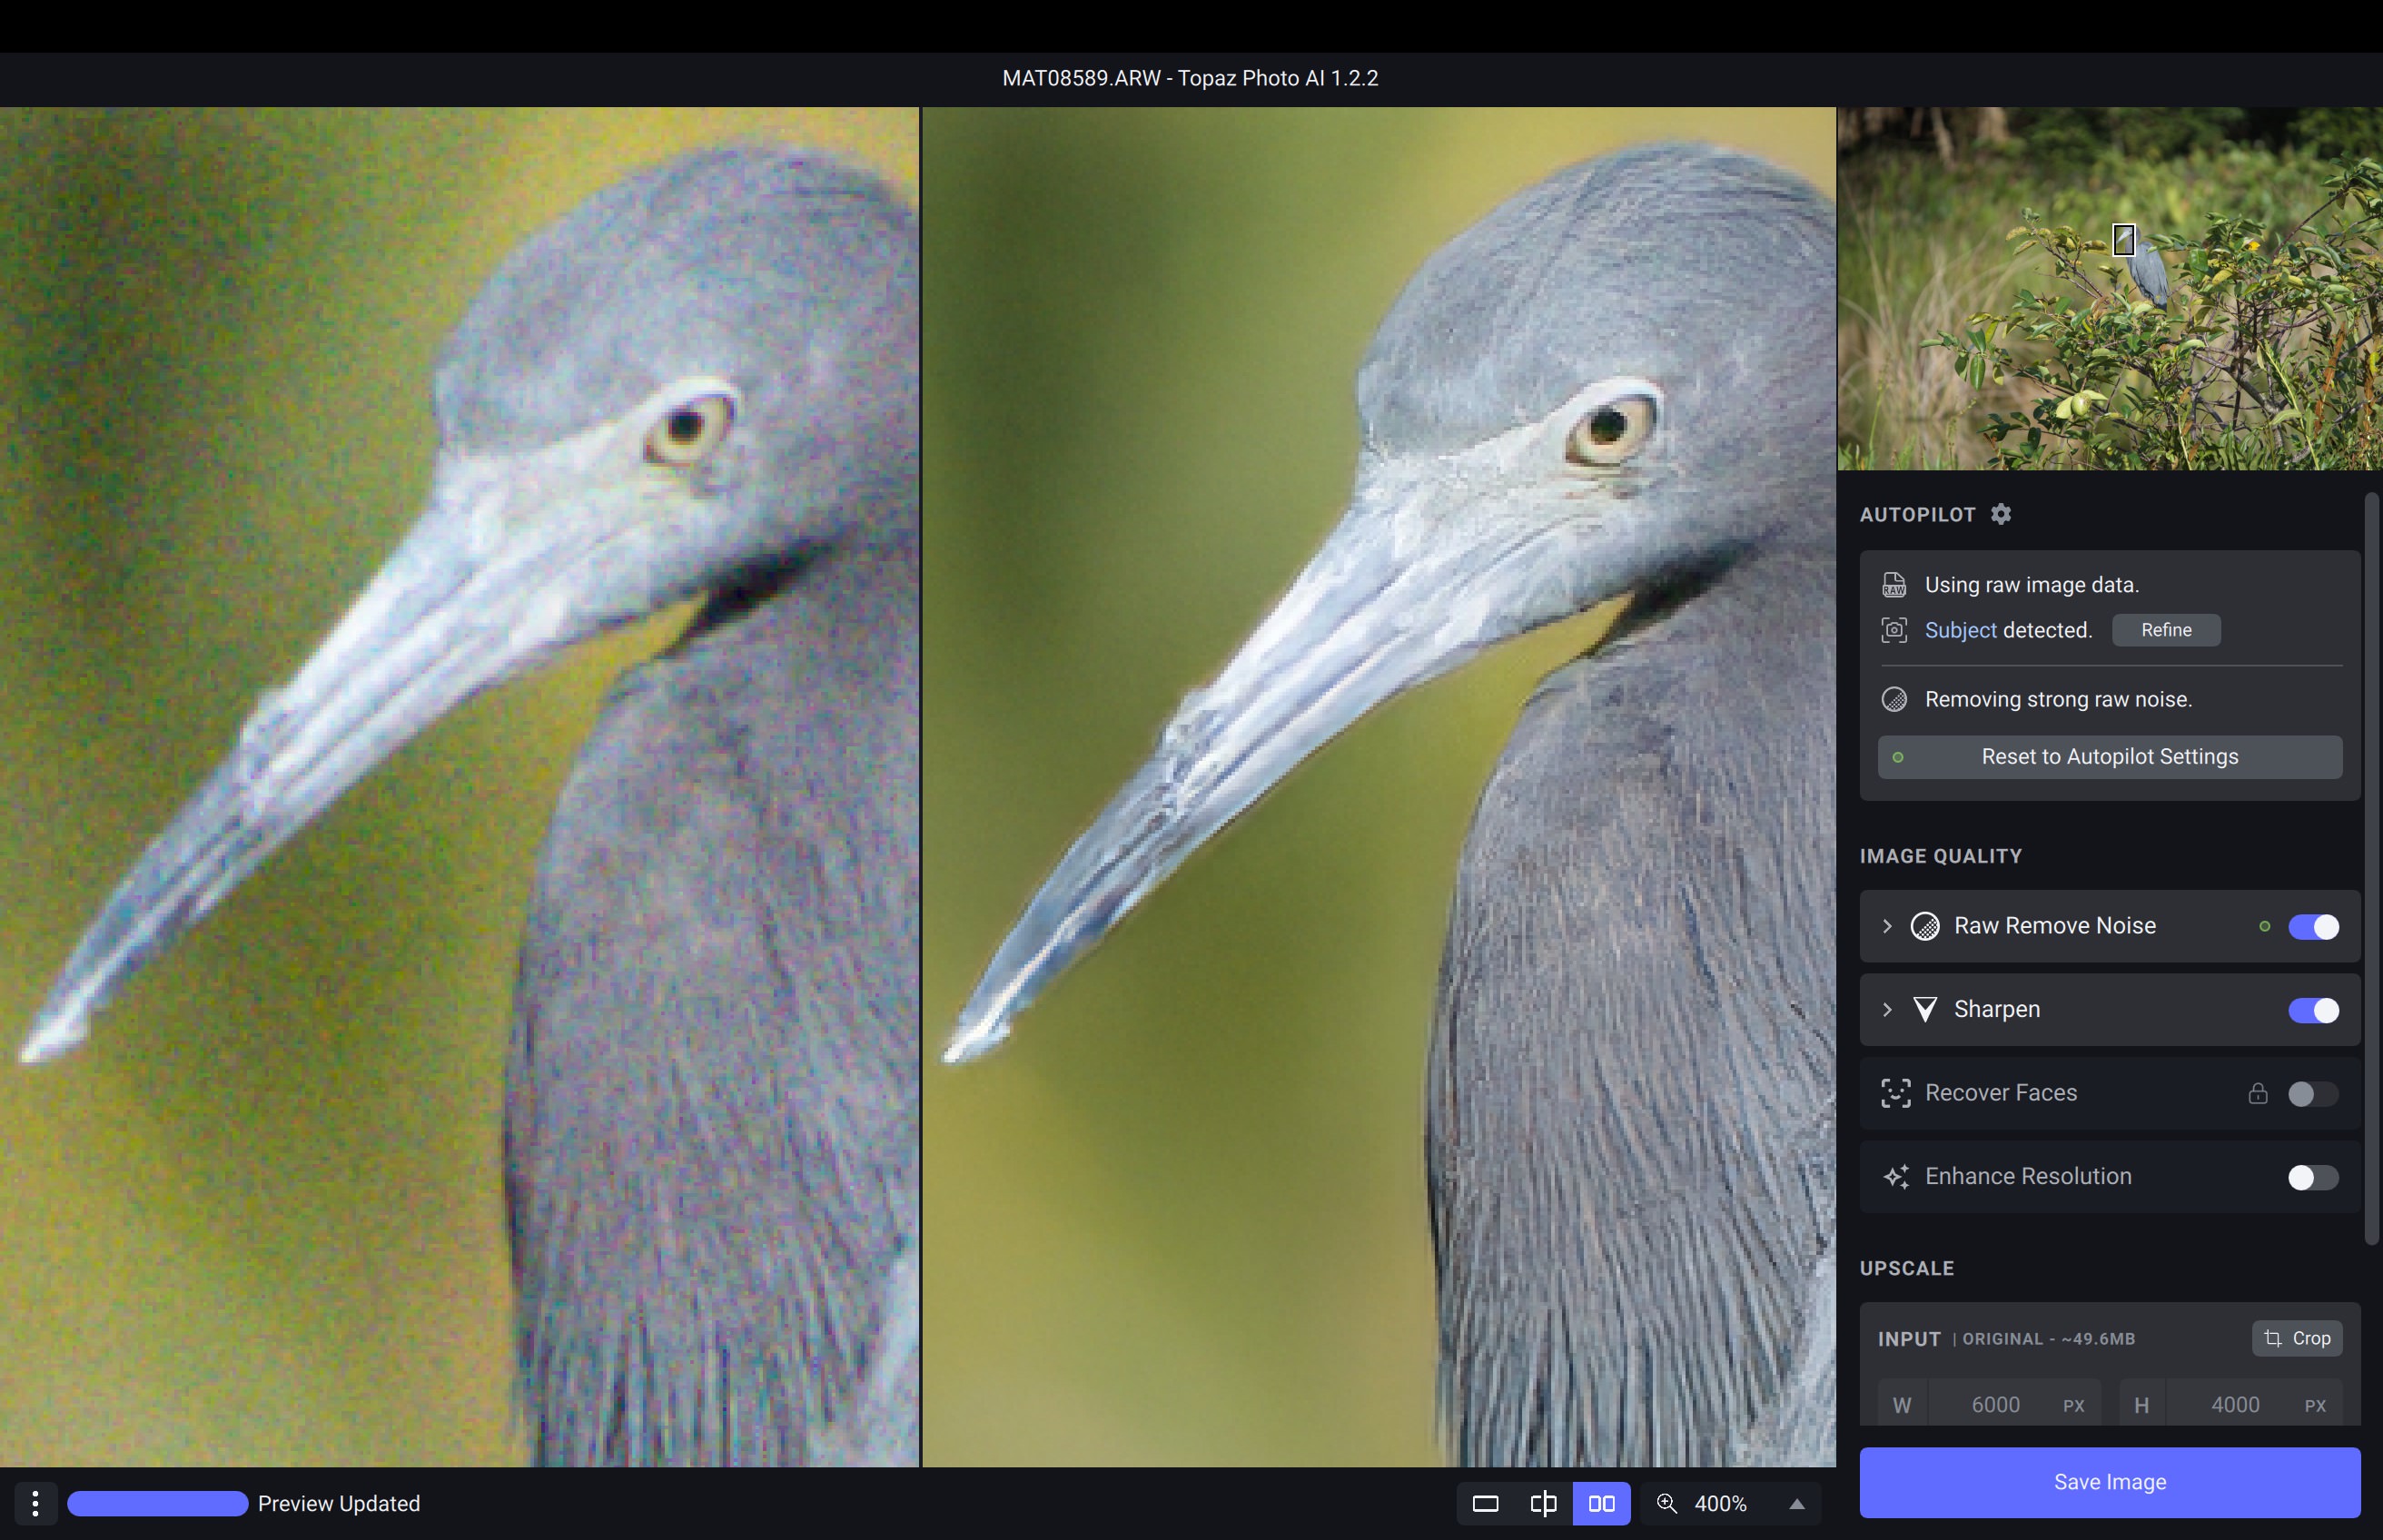
Image noise reduction software is designed to remove unwanted noise from an image, making it look cleaner, smoother, and more visually appealing. Now that you have a better idea of what image noise is and how it occurs, it's time to understand why image noise reduction is crucial. Here are a few reasons why image noise reduction is essential:
1. Enhancing image quality
Image noise reduction software enhances the quality of an image by removing unwanted visual information, such as dots, specks, or pixels. This makes the image look more professional, visually appealing, and overall better. This is the most important benefit of using noise reduction software.
2. Saving time
Removing noise manually from an image can take time, especially for non-tech-savvy individuals. You can also inadvertently reduce the image quality by not using optimal settings. Image noise reduction software automates the process, saving time and effort and making it easier for individuals to edit their images.
3. Improving clarity and removing distractions
In addition to being unsightly, image noise detracts from presenting maximum clarity in your photo. Removing noise from an image enhances its clarity and detail, making it easier to see and analyze the details of the primary subjects in your image, and it is especially important for photographers who must present their images as best as possible.
Should you apply image noise reduction to RAW or JPEG files?
Applying noise reduction software to a raw file can provide additional benefits over applying it to a JPEG file. When capturing a JPEG image, the camera sensor records a vast amount of data, which is then compressed and saved as a JPEG file. This compression process can result in the loss of image quality and detail. In contrast, a RAW file is the uncompressed and unprocessed image data captured by the camera sensor. It contains all the information the camera sensor captured, including the noise in the image.
By applying noise reduction software to a RAW file, you have access to all the information captured by the camera sensor, giving you more control over the noise reduction process. That is because RAW files contain more information and detail than JPEG files, making it easier for the software to identify and remove the noise in the image. Additionally, the noise reduction process can be adjusted more precisely without causing damage to the image's quality and detail.
Moreover, when a JPEG file is saved, the camera may apply some level of noise reduction to the image before saving it, depending on the camera settings and onboard image processing pipeline. If you add additional noise reduction to a JPEG file, your image may become over-processed and lose even more detail or image quality. In contrast, RAW files do not have any noise reduction applied, so applying noise reduction software to a RAW file gives you far more control over the final image quality.
That's why applying noise reduction to a RAW file at the beginning of your post-processing workflow is particularly important if you want the highest quality and detail in your images. However, it is worth noting that RAW file sizes are larger than JPEG files and requires more storage space, so it is essential to have sufficient storage capacity when working with RAW files.
Popular Image Noise Reduction Software
Now that you understand the importance of image noise reduction, it's time to explore some popular image noise reduction software I've used and enjoy. It's important to note that there are many noise reduction apps and utilities, and this is far from an exhaustive list. Rather, I want to include only the apps I have extensive experience with and feel comfortable recommending.
Topaz Photo AI (and DeNoise AI)
Topaz Labs has many years of experience with AI-based noise reduction with Topaz Photo AI's predecessor, DeNoise AI, which is why it's my top recommendation for image noise reduction. Topaz Photo AI uses Autopilot to analyze an image for various objective image quality issues, including excessive image noise and then recommends advanced AI models to fix them. Autopilot can also differentiate between RAW files and other formats and recommend optimal settings to achieve the highest quality noise reduction while enhancing image details.
Adobe Lightroom
Adobe Lightroom is a popular photo editing software often used by many hobbyists and professional photographers. It has a noise reduction tool that is easy to use and provides users with several options to adjust the amount of luminance and color noise reduction applied. Unfortunately, Lightroom's noise reduction can result in blotchy patches and a reduction of edge detail. It's fine in a pinch, but I recommend exploring other, more capable alternatives.
Adobe Photoshop
Adobe Photoshop is one of the most powerful image editing apps available. The number of ways Photoshop can improve an image is staggeringly large. That's why photographers, graphic designers, and digital artists rely on it. Unlike Lightroom, which has somewhat simplistic noise reduction, Photoshop offers several ways to eliminate image noise. With that said, Photoshop does have a steeper learning curve and often requires more manual intervention.
Wrapping it up
Image noise reduction software is essential for anyone who wants to enhance the quality of their images. The best noise reduction tools eliminate distracting visual noise, improve clarity and detail, and provide consistency across multiple images. Fortunately, many popular image noise reduction apps are available, and most are user-friendly, easy to use, and reasonably priced. As AI technology advances, we can expect even more advanced image noise reduction software to be developed, making editing your images easier and achieving the best possible results.
The Only Course Designed to Help You Use Lightroom Everywhere!


